
Solidworks 2017 Activator Archives

Solidworks 2017 Activator Archives
SOLIDWORKS Toolbox Library Setup and Utilization
In this folder find and launch the application: “Update browser database”.
Once in the utility some information will be provided, and some will need to be selected. First, it will display both the directory to the toolbox and its version. This is loaded from Solidworks, if this window is blank simply navigate to the database file “swbrowser.sldedb” it exists at \lang\english.
The application will automatically fill out the updating database information. It will reference the folder used to launch the updater from, since this folder contains the updating information.
Before using the updater check out the database file swbrowser.sldedb, in the case a file named swbrowser.sldedbold is also found in the directory it will need to be checked out as well.
Run the update utility it’ll take several minutes. Once this is complete the toolbox will be updated. Test functionality by launching the toolbox inside of Solidworks.
After the update check-in the database and have users get latest so the changes are reflected for all users.
Toolbox Setup
The toolbox can populate bills of material, contain materials, and automatically be added to assemblies. These functions, though powerful, must be configured up by the user(s). Ideally these would be set up before rollout. As compared to having and incremental implementation.
Permissions
Toolbox contains its own permission structure to limit individual user’s ability to edit specific parameters linked to the toolbox. To activate the toolbox permissions simply create a password and security phrase to lock the toolbox. After this has been created all users wishing to change locked aspects will need the administration code to do so. This limits the users from being able to make changes with unintended consequences.
Each setting has a specific purpose.
How to Install Multiple Versions of SOLIDWORKS on One PC
When a new version of SOLIDWORKS is released, most users choose to perform an upgrade on their machine. However, what if one of your customers is still stuck on an older release, while you already made the upgrade? If you are caught in this situation, there is a way to keep a previous version on the same machine.
SOLIDWORKS has an option to install previous versions of the software without losing any existing installations. In the steps below, I’ll demonstrate how to install the 2015 version of SOLIDWORKS on a machine that already has either a newer or existing version.
Step 1: First, we’ll run the setup.exe from the installation media.

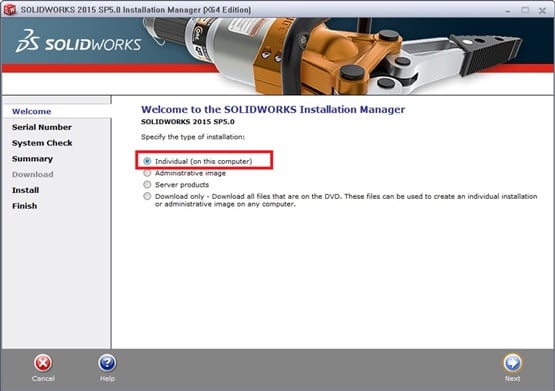
Step 2: On the welcome screen, select the Individual option and then next.
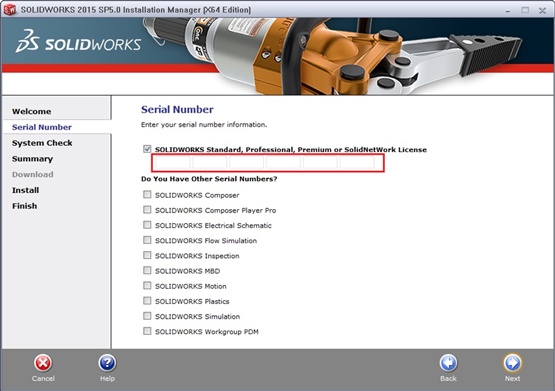
Step 3: Enter the SOLIDWORKS serial number and then click on Next. If additional serial numbers are needed, please check the boxes below to make sure they’re entered.
NOTE: This may be prepopulated from a previous install.
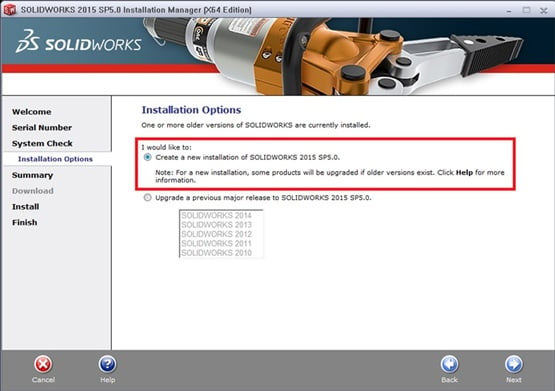
Step 4: When choosing an installation option, select the Create a new installation of SOLIDWORKS and then Next.
This will install the SOLIDWORKS version on the machine while keep existing versions as well. Notice below, SOLIDWORKS does recognize previous versions already installed had we chosen an upgrade. This example will install 2015 while keeping the existing versions.
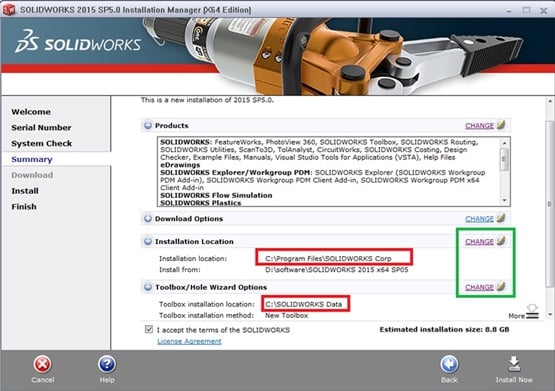
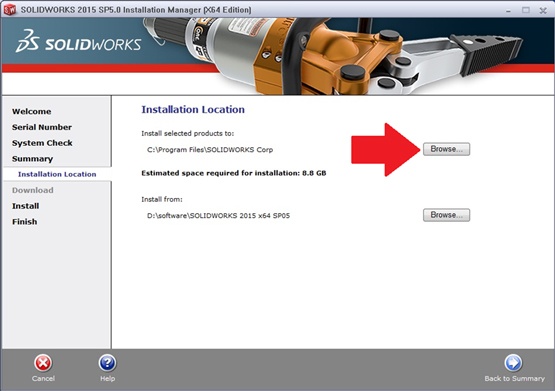
Step 5: On the summary page, there will be a screen that summarizes the settings for installing another version. The two file paths highlighted in red below are for installing the main SOLIDWORKS software and the toolbox files. Our recommendation would be to change these locations to differentiate the SOLIDWORKS versions.
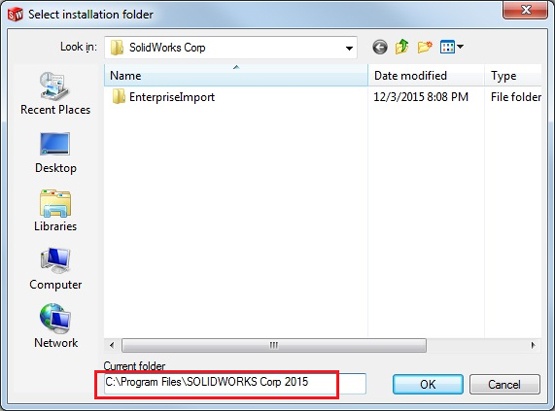
Step 6: By clicking on Change from the previous screenshot, there will be an option for modifying the folder names for these paths. Choose Browse to edit the folder name.
Step 7: Add 2015 to the end of the file path and click OK. If it tells us the folder does not exist, select Yes to create a new folder.
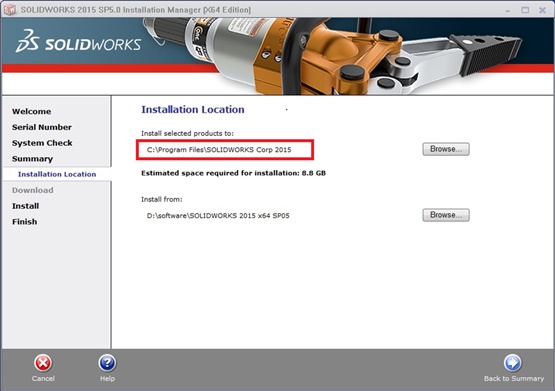
Step 8: Notice that the folder name has been changed. Click on Back to Summary to return to the previous window.
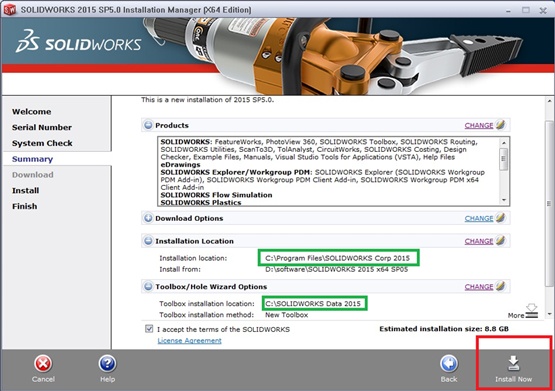
Final Step: Repeat the same steps for the toolbox location. Once finished, both the installation and toolbox locations now have the version year in their respective paths. Once we verify the rest of the options, we can go ahead and click Install Now.
Q&A:
Q: If I had, for example, 2015 installed and wanted to install 2016 (a newer version), can I install 2016 and keep 2015?
Yes, repeat the same steps above to install a newer version without upgrading. This would theoretically keep both 2015 and 2016 on the same machine.
Q: Why would a user want to keep different versions on the same machine? Shouldn’t they always be on the latest release?
Some customers may not have had a chance to upgrade, or certain customer’s work with vendors that are still on different versions. Older versions of SOLIDWORKS files will work with the newer versions but not vice versa. Therefore, keeping different versions of the software allows customers to work with their vendors accordingly.
Q: How is my serial number affected? Does it take up an extra activation? Is there an extra cost for keeping multiple versions of SOLIDWORKS on the same machine?
This is one of our favorite questions because the answer may not be what you expect. Many people have misconceptions about a previous version tying up a license.
Here’s the good news: keeping two or more versions on the same machine will use the existing serial number currently on the machine and will not take up an extra activation. We can theoretically have multiple versions opened up at the same time and it will still take up only one activation. This applies to both a standalone and network license.
Q: Will there be any issues with settings and other related products if I keep multiple versions of SOLIDWORKS?
Please refer to this link about Product Coexistence Rules:
http://help.solidworks.com/2016/English/Installation/install_guide/c_product_coexistence_rules.htm
One important note about the link mentions the service pack rule. We cannot keep multiple services packs of the same version on the same machine.
Q: Is there a way to copy settings from different versions (ex. toolbars, shortcuts, etc.) using the Settings Copy Wizard?
The answer is no, they cannot be used in an environment with a different major version.
Note: If it is the same major version, the Settings Copy Wizard can be used regardless of whether the service packs are different, but it is preferable to use the same environment if at all possible.
Jackie Yip is an Application Engineer at Alignex, Inc. and contributor to the Alignex Blog. When Jackie isn’t assisting customers on the Alignex Help Desk or teaching a SOLIDWORKS Essentials class, he enjoys road biking and keeping up on the latest tech trends. Find more tech tips and blog posts by Jackie Yip on the Alignex Blog.
Latest posts by Alignex, Inc. (see all)
How To Access Your Standalone Licenses From More Than One Computer
Are you an engineer on the go and need to access your SOLIDWORKS software from your laptop as well as your workstation? Or perhaps your company requires licenses to be transferred often between machines? We have a couple of solutions to make it easier for you to access your standalone SOLIDWORKS license from more than one computer.
Inside SOLIDWORKS there is an Activate/Deactivate mechanism to release the license back into the server and allow the license to be accessed by another computer. This is an easy, fast, and proven method that makes it easy to ensure compliance with your license usage and provides versatile access to your standalone SOLIDWORKS license across multiple computers.
- From within SOLIDWORKS, go to the Help menu and select Deactivate Licenses
- From the Deactivation screen that appears…
- Click the Select All button
- Ensure that an email has been entered in the E-Mail: box provided.
- Click Next
- The system will then deactivate the license(s) from the machine. The system will confirm this by showing a window of currently activated products. It should be empty. Click Finish to complete the task.
- SOLIDWORKS will then automatically close
- Open SOLIDWORKS.
- If the licenses have been deactivated from that machine (or have never been activated), the SOLIDWORKS Product Activation window will automatically appear.
- Select the option I want to activate my SOLIDWORKS product now and then click Next
- From the Activate screen that appears…
- Click the Select All button
- Ensure that an email has been entered in the E-Mail: box provided.
- Click Next
- The system will then activate the license(s) on the machine. The system will confirm this by showing a window of currently activated products. It should list all products installed on the machine. Click Finish to complete the task.
- SOLIDWORKS will then automatically open.
The following video explains this process: https://solidworks.2winbridge.com/p/Stand-Alone-License-Transfer-2017.
If your company requires you to transfer licenses often, it can become a little time consuming to open SOLIDWORKS and run the activation or deactivation process over and over again. Not to worry, we have a workaround that can make this process a little easier. This can be achieved by running the Activation/Deactivation process outside of SOLIDWORKS.
- Navigate to the SOLIDWORKS installations folder (typically C:\Program Files\SOLIDWORKS or SOLIDWORKS Corp) and navigate down to the \setup\i386 folder
- Find the executable swactwix.exe (not to be confused with swactwiz_s.exe) and create a shortcut of this file to the desktop (or pin it to the taskbar)
- Repeat the above steps on all machines where license transfers are going to occur
Double click on the shortcut that was created. You will see the following window:

Select the 1st radio button to deactivate a license or the 2nd radio button to activate/reactive a license and then click Next.
> The remaining steps in the process are the same as the two sections titled “How to Deactivate a License” and “How to Activate or Re-activate a License” above.
Now you are free to enjoy the use of your standalone SOLIDWORKS license from the convenience of anywhere you choose.
Special thanks to our technical team, notably, Austin Dumas for all the technical details and images used in this blog!
What’s New in the Solidworks 2017 Activator Archives?
Screen Shot

System Requirements for Solidworks 2017 Activator Archives
- First, download the Solidworks 2017 Activator Archives
-
You can download its setup from given links:

Solidworks 2017 Activator Archives & Free Download

Solidworks 2017 Activator Archives& Crack
