
CameraFi for mac Archives

CameraFi for mac Archives
CameraFi For PC/Laptop (Windows 10/8/7 and Mac OS) Free Download
In this article, learn how to download and install CameraFi for PC/Laptop (Windows 10/8/7 and Mac OS) for free.
CameraFi is an app to display and record video developed by Vault Micro, Inc. which lets you connect USB Camera and Webcam on your Android device letting you to take photos and record videos using your USB Camera.
In our website, you can find the links through which you can get CameraFi on Android and iOS devices:
CameraFi for Android
CameraFi for iOS
Can you use CameraFi on PC? This tutorial will show you how to get CameraFi on your PC/Laptop (Windows and Mac OS).
How To Download and Install CameraFi For PC (Windows 10/8/7 and Mac OS)
Step 1. To begin, download and install Bluestacks on your PC. Click this link to download for free. You can refer top 5 Android Emulators for PC from here.
Step 2. Launch Bluestacks App Player and log in to your google account in order to get into access to your Play Store.
Step 3. Download CameraFi for PC from this site.
File: CameraFi APK
Author: Vault Micro, Inc.
Latest Version: 2.21.9.1218
Publish Date: 2018-12-18
Step 4. Tap on the CameraFi APK for PC to install it. Wait for the process to get finished.
You may also like: How To Install APK on Bluestacks
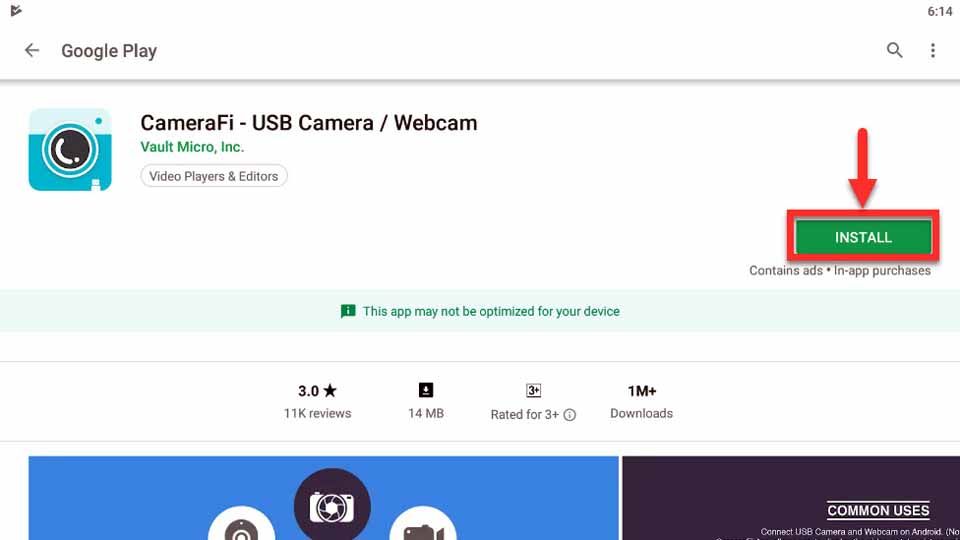
Hints: You can go to Google Play Store and search for CameraFi USB Camera / Webcam. You will see the search result for CameraFii Download for PC, then click on Install button to setup it.
Download and Install CameraFi For PC (Windows and Mac OS)
Now you can use CameraFi on PC, just like CameraFi for PC version.
Key Features of CameraFi For PC Free Download:
– Do not need root device.
– Supported video size: SD(640×480), HD(1280×720), Full HD(1920×1080) and more.
. It depends on screen resolution supported by a USB camera.
– Video & Audio Recording.
. CameraFi supports UVC (USB Video Class) and UAC (USB Audio Class)
– (Broadcast Live Streaming) => Please e-mail us.
– Still image capture.
– Display USB camera connection status.
– Switching a camera when multi USB cameras connected.
– Recorded video and captured image file viewer.
– Set image and video file prefix
– Set capture and recording using volume key.
– Check app update.
– Item Shop
– Ruler Plug-in
VIDEO TUTORIAL: How To Download and Install CameraFi on PC (Windows 10/8/7)
Hope something helps you.
The Unarchiver 4+
Open any archive in seconds
MacPaw Inc.
Screenshots
Description
The Unarchiver is a small and easy to use program that can unarchive many different kinds of archive files. It will open common formats such as Zip, RAR (including v5), 7-zip, Tar, Gzip and Bzip2. It will also open many older formats, such as StuffIt, DiskDoubler, LZH, ARJ and ARC. It will even open other kinds of files, like ISO and BIN disc images, some Windows .EXE installers. The list is actually much longer - see the program homepage for the full list.
The Unarchiver also tries to detect and correctly handle the filename encoding in the archives it opens, allowing you to open files from every part of the world without getting garbled filenames.
The Unarchiver aims to be the only unarchiving program you will ever need, and to stay out of your way.
Also, if you need to open archives on your iPad or iPhone, look for "Archives" on the App Store, or go to https://theunarchiver.com/archives. It is based on The Unarchiver, and lets you easily handle Archives on iOS!
Version 4.2.2
Fixed:
• RAR 1.5 extraction is working once again.
• RAR 5 solid archives extraction is now working as expected.
Until this version 3.1.2 it was a 5 star now maybe 4
Then they had a problem with 3.11.2, which they think they fixed in 3.11.3. However there are more problems with version 3.11.3. Before the last two versions, I could choose ‘Compress “some directory”’ from the finder menu, and then few minutes later I could uncompress it by using “The Unarchiver”. Now, randomly I get a notofication about the encoding the compressed file uses. So i am temporarily using command line tools to do the operations. BTW, there seems to be another bug that comes up if you select more than about 250 files from Finder and invoke “The Unarchiver”. Then somehow “The Unarchiver” memory gets corrupted, and the menus no longer work(e.g. Quit button disappears.) and the program hangs. Have to force quit it externally. I should mention Xee 3.5.3(marketed by the same company) inherited a bug in the new release, that it can no longer reliably read .cbr and .cbz(or .rar or .zip) files reliably either. Some pages show up as noise, where as other programs(like Comic Reader). So on Xee I rolled back to 3.5.2
Poor error handling
Been using this for years. The app works fine most of the time, but when something is wrong with the archive, the app doesn’t give anything resembling useful information about the error. It just basically tells you something’s wrong. What’s wrong? No details whatsoever other than it can’t extract. When that happens, I have to turn to the unfortunately abandoned UnRarX, which has a test function which tells me what’s wrong with the archive, such as a corrupted part.
Cannot deselect file formats in Preferences
I just installed The Unarchiver, and am attempting to set its preferences. When I try to deselect a file format which I do not want The Unarchiver to expand by default, it will not allow me to do so. It pops up a dialog saying "Set another app as the default app for selected file types if you wish. In smaller print, it describes the procedure to assign default applications to specific file types.
This behavior is extremely annoying. Even if I did not already know how to assign default applications, I should not be required to do so before I can deselect a file type in The Unarchiver's preferences. This behavior is enough to stop me from using the application. Please fix this obnoxious behavior. It is unreasonable.
Information
- Compatibility
OS X 10.7 or later, 64-bit processor
- Languages
English, Arabic, Bulgarian, Czech, Dutch, French, German, Hungarian, Italian, Japanese, Latvian, Norwegian Bokmål, Polish, Portuguese, Russian, Simplified Chinese, Spanish, Swedish, Turkish, Ukrainian
- Copyright
- © 2011-2020 MacPaw Inc.

Family Sharing
With Family Sharing set up, up to six family members can use this app.
Download CameraFi App for PC (Windows 7, 8, 10 & Mac)
 BlueStacks has afforded PC users with the ability to download, install, and run Android-based applications on their very own computers. Using the BlueStacks emulator, it acts as though you are using an Android device right on your PC.
This affords users a number of different opportunities to use gaming apps, entertainment apps, and so much more that they may not have been able to do prior to using BlueStacks.
For those with CameraFi, you may be wondering how to get it on your PC. This tutorial will show you how to get CameraFi installed on your PC or Mac.
Install BlueStacks on the PC
None of this works without BlueStacks. You can download it for free on several sites across the web. Once you’ve downloaded it, double-click on the .exe file to extract and install it. You will follow the prompts, connecting an email for registration purposes. Once you’ve done this, it will take you to a “home” interface that looks just like a standard Android interface.
Congratulations, you have half of the process complete already and it was all too easy. The next step is to get CameraFi.
Downloading CameraFi for PC
After you have downloaded and installed BlueStacks on your PC or Mac and followed the steps to register, the next step is to download the CameraFi application. Save the .apk file to your desktop and wait for it to finish downloading.
When it has saved to your desktop, you are ready to install it using BlueStacks.
Installing CameraFi PC via BlueStacks Emulator
When your CameraFi file is finished downloading, you will right-click on the .apk file on your desktop and “open with -> BlueStacks APK Handler”.
Once you have initiated this process, you will see a window letting you know that the install has initiated. Additionally, you will see the CameraFi icon appear in the “installed apps” window of BlueStacks.

When the installation is complete, you will receive an alert in the bottom right corner (if using Windows 10) and the CameraFi icon will also appear on your desktop.
When you initialize the CameraFi app, it will prompt you with a download if a new version of the software is available. Whether you want to update to the most current version is entirely up to you.
After that, it is just a matter of hooking your digital camera up to your computer and transferring over the images that are stored on the digital camera.
It is that easy! Now you have the CameraFi app installed on your computer.
Also Read:F Photo Editor for PC (Windows & Mac)

What’s New in the CameraFi for mac Archives?
Screen Shot

System Requirements for CameraFi for mac Archives
- First, download the CameraFi for mac Archives
-
You can download its setup from given links:

CameraFi for mac Archives & Apps for Laptop & PC Free Download

CameraFi for mac Archives& Key Download
