
SpywareBlaster Key Archives

SpywareBlaster Key Archives
Category: Anti-virus

SpywareBlaster Crack 5.5 & Serial Keygen [Latest] 2020
SpywareBlaster Crack & Serial Keygen Is Here!’ SpywareBlaster Crack is growing from technologies and so is the internet today. And the threats lurking around its corners are constantly increasing. For this reason, you will need the best safety your unit
Continue reading
Avast Premier Crack With License Keygen & Activation Code till 2040
Avast Premier Activation Code Is Here! Avast Premier Crack is the premium security package for your company and contains Browsing Security, Firewall, Engine, and Browser Cleaning Tool. The application interface is comfortable and clean to use. Click “Run the smart
Continue reading
GridinSoft Anti-Malware Crack 4.1.54 & Activation Code Latest 2020
GridinSoft Anti-Malware Crack 2020 is Here! GridinSoft Anti-Malware Crack (Formerly Trojan Killer) is the farthest, effective, and reliable answer to anti-malware. As a result of this fact, this system has been specially developed for automatic removal of viruses, bots, spyware,
Continue reading
Malwarebytes 4.5.14.3726 Crack MAC Full Serial Keygen [Latest] 2020
Malwarebytes Crack MAC Full Serial Key 2020 Is Here! Malwarebytes Crack Mac (was AdwareMedic) helps you get Mac experience again. Malwarebytes scans and removes code that reduces system efficiency or attacks your system. Make your Mac as soon as it
Continue reading
Bitdefender Total Security Crack With Activation Code [Lifetime] Latest
Bitdefender Total Security Crack With Activation Code [Lifetime] Latest 2020 Full Download Bitdefender Total Security Crack is an excellent security solution for antivirus and computers. It guarantees your information and files on the Internet. Protects email options and browsers. Bitdefender
Continue readingIntroduction
Many Spyware, Hijackers, and Dialers are installed in Internet Explorer through a Microsoft program called ActiveX. These activex programs are downloaded when you go to certain web sites and then they are run on your computer. These programs can do a variety of things such as provide legitimate services likes games or file viewers, but they can also be used to install Hijackers and Spyware on to your computer without your permission.
SpywareBlaster, a program created by Javacool, is used to secure Internet Explorer so that it is harder for these ActiveX programs to run on your computer, as well as disabling the ability of certain known offending ActiveX programs from running at all. This program also has the ability to stop certain cookies from being added to your computer when running Internet Explorer and Mozilla Firefox.
This tutorial will explain how to use SpywareBlaster to provide the best protection for your browser. It is mostly geared towards the users of Internet Explorer but users of Firefox will also gain from this program as well.
How to use SpywareBlaster to secure your browser
Step 1: Download and install SpywareBlaster.
Download SpywareBlaster from Javacool's sit at this link SpywareBlaster Download Link. When you download it, save the file to a location on your hard drive that you will be able to find later. When it is download you will want to navigate to the folder where you saved it and double-click on it to install the program. Follow the prompts and choose the default locations when installing the program. When the program is done installing it will place an icon on your desktop.
Double click on the SpywareBlaster icon and you will be presented with a brief tutorial. On the first page of this tutorial, you will see some of the features that SpywareBlaster consists of. At this point you should click on the Next button to proceed to the second page of the tutorial as shown in Figure 1 below.
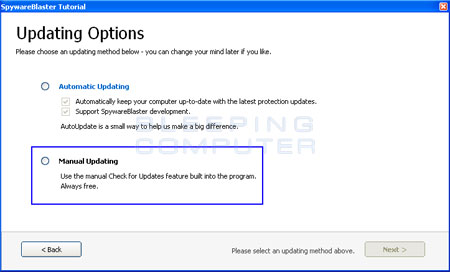
Figure 1. Update options in Tutorial
If you want to purchase the software, then you should select Automatic Updating. If you do not plan on purchasing the software, then you should select the option for Manual Updating and press the Next button. At the next screen, simply press the Finish button to get to the main screen as shown in Figure 2 below.
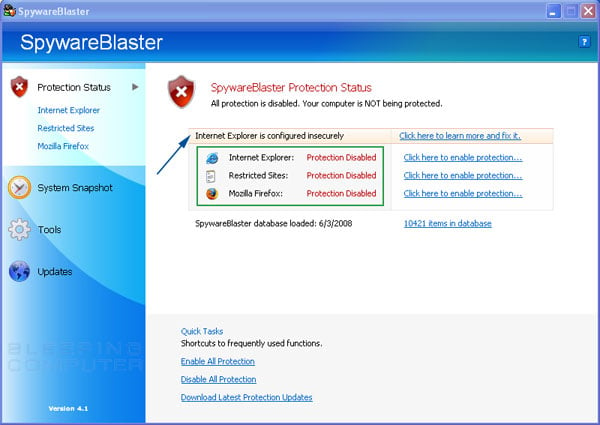
Figure 2. Protection/Status Screen for SpywareBlaster
The protection screen is where you will do most of the work in securing your browser from running malicious programs. Lets take a moment to go through each of the key components of the Protection section:
Internet Explorer, Restricted Sites, and Mozilla/Firefox - These sections, designated by the green box in Figure 2, are the core functions of SpywareBlaster. You will use these sections to tell your browser what ActiveX programs should not be allowed to run, what cookies should not be allowed to be installed, and what sites are known to be malicious and should have more restrictions when you are visiting them.
Internet Explorer is configured insecurely - If you see this alert, designated by the blue arrow in Figure 2, it means that SpywareBlaster has detected that the Internet Explorer security settings are not strong enough and that they should be changed to make your browser more secure. We will go into more detail on how to fix this further into the this tutorial.
Step 2: Updating SpywareBlaster
Your next step should be to update SpywareBlaster. This will make sure SpywareBlaster has the latest definitions e so that it can protect your browser more efficiently. You should update SpywareBlaster regularly, as much as every few days, in order to provide the best protection. When you click on the Updates button you will be presented with a screen similar to Figure 3 below
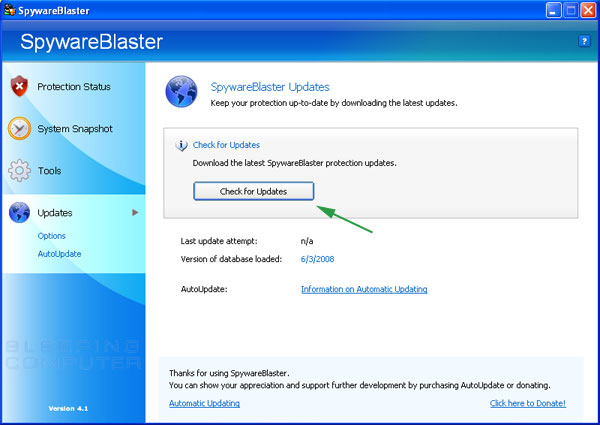
Figure 3. Updating SpywareBlaster
You should click on the button labeled Check for Updates designated by the green arrow in Figure 3. Once you click on this button, SpywareBlaster will check for new updates that may be available. Once it connects, if SpywareBlaster finds new updates, it will download them, install them, and alert you that the program has been updated. Otherwise it will tell you that SpywareBlaster is up to date and that there is nothing to download.
Step 3: Protecting your browser
You should now click on the Protection Status button to go back to the main status screen as seen in Figure 2.
If you see an alert stating that Internet Explorer is configured insecurely you should click on the link labeled Click here to learn more and fix it. This will bring you to a screen similar to Figure 4 below. If you do not see this alert, you should be happy as your browser has the correct options set and you can skip to Step 4.
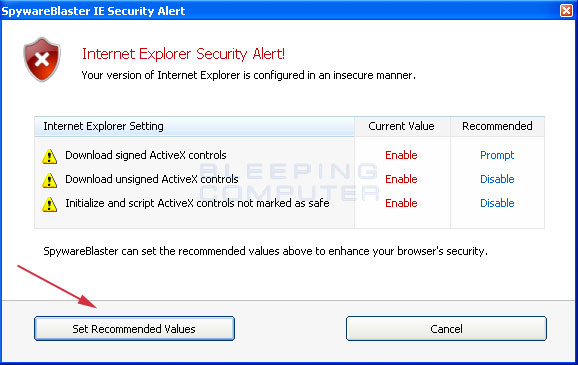
Figure 4. IE Security Alert
It is highly recommended that you choose to fix the settings that it presents to you. This will provide you with a much more secure browser that will not be as susceptible to malicious ActiveX programs. To do this, click on the button designated by the green arrow labeled Set Recommended Values. Once you click on the button, you will be brought back to Protection Status screen, except now you will no longer have the alert.
Step 4. Internet Explorer Protection
You should now click on the link labeled Click here to enable protection... next to the Internet Explorer label in the status screen. This will bring you to a screen similar to Figure 5 below. This screen will allow you to make settings to Internet Explorer that will stop it from running known malicious ActiveX programs as well as cookies that are known as being related to Spyware.
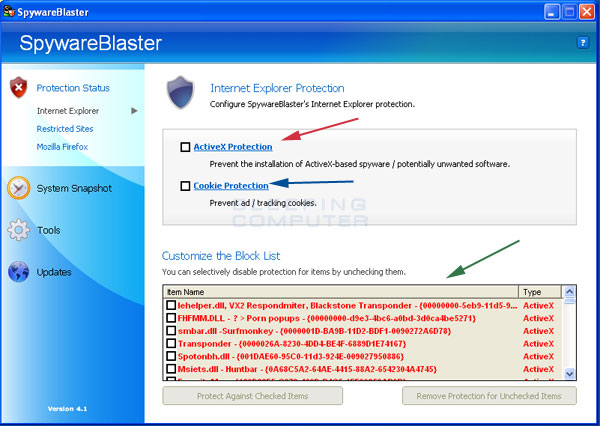
Figure 5. Internet Explorer Protection
If you put a check mark in the checkbox labeled ActiveX Protection, designated by the red arrow, your browser will no longer be able to run ActiveX programs specified in the Block List which is designated by the green arrow. This will automatically protect you from all the known malicious ActiveX programs in the list. It is advised that you allow SpywareBlaster to protect you, so you should put a checkmark in this box.
If you want to remove protection from certain items, you can uncheck that particular item and click on the Remove Protection for Unchecked Items button.
Advanced Tip: This is done by adding the CLSID, which is the number between the curly brackets { 000..etc } under the registry key HKEY_LOCAL_MACHINE\SOFTWARE\Microsoft\Internet Explorer\ActiveX Compatibility. You then make a dword value called "Compatibility Flags " and make it the hexadecimal value of 400. This is called the killbit and will stop the program from being able to run on your computer.
If you put a check mark in the checkbox labeled Cookie Protection , designated by the blue arrow in Figure 5, SpywareBlaster will stop your browser from accepting certain cookies specified in the Block List designated by the green arrow in Figure 5. By putting a checkmark in this box, SpywareBlaster will automatically block all attempts for these types of cookies to be placed in your browser. It is advised that you allow SpywareBlaster to protect you by putting a checkmark in this box.
If you want to remove protection from certain items, you can uncheck that particular item and click on the Remove Protection for Unchecked Items button.
Advanced Tip: SpywareBlaster blocks the cookies by placing the entries in the settings for your Internet Explorer via the registry in the key HKEY_LOCAL_MACHINE\Software\Microsoft\Windows\CurrentVersion\Internet Settings\P3P\History. The cookie domain is added as a subkey and a dword value called Default is added with a hexadecimal value of 5 for always block or 1 for always allow.
Step 5. Internet Explorer Restricted Sites
You should now click on the option labeled Restricted Sites in the left-hand navigation menu. This should bring you to a screen similar to Figure 6 below. This screen will allow SpywareBlaster to restrict your browser from running Java, ActiveX, and other downloads from known malicious sites.
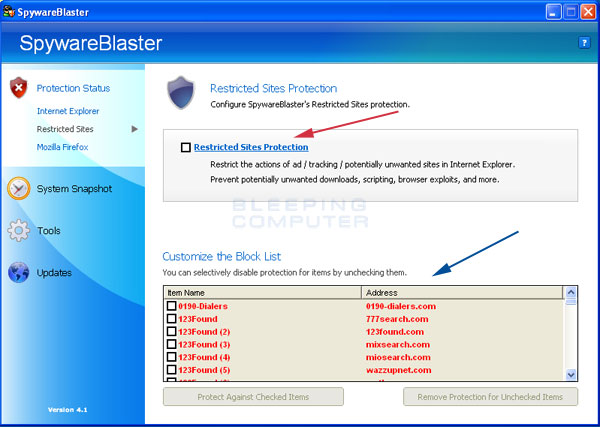
Figure 6. Restricted Sites
By placing a checkmark in the checkbox labeled Restricted Sites Protection, SpywareBlaster will add all the domains listed in the Block List, designated by the blue arrow in Figure 6, into the Restricted Sites section of the Security tab in your Internet Explorer Internet Options section. It is advised that you let SpywareBlaster add these sites to your Restricted Sites list by putting a checkmark in the box.
Once again, if you would like to remove one or more of the sites from your Restricted Sites, you can uncheck that particular site and click on the Remove Protection for Unchecked Items button.
Advanced Tip: SpywareBlaster adds sites to the restricted zones by adding the domain as a subkey under the registry key: HKEY_CURRENT_USER\Software\Microsoft\Windows\CurrentVersion\Internet Settings\ZoneMap\Domains. A dword is then added to that domain named * and given a hex value of 4 to specify that it is part of the Restricted Sites Zone.
Step 6. Mozilla/Firefox Protection (Only if you use this type of browser)
If you use a Mozilla or Firefox browser then you should read this section, otherwise you can skip it. To protect Firefox you should click on the option labeled Mozilla Firefox in the left-hand navigation menu. This will bring you to the screen show in Figure 7 below. This screen allows you to block cookies from the sites in SpywareBlaster's database.
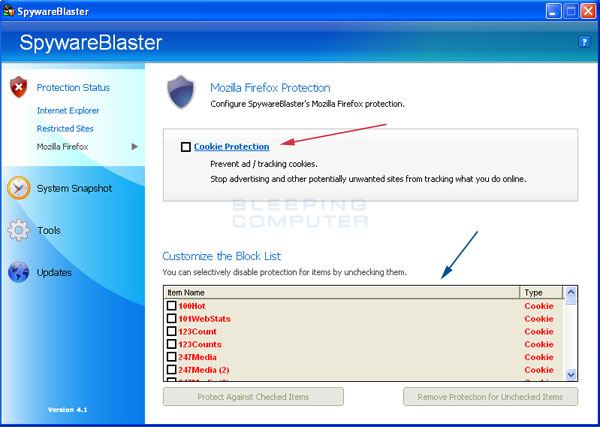
Figure 7. Mozilla/Firefox Protection
To protect Firefox, put a checkmark in the box labeled Cookie Protection, designated by the red arrow in Figure 7 above. Once you place the checkmark, SpywareBlaster will automatically add the Block List, designated by the blue arrow, to Mozilla Firefox so that it will automatically block these cookies. It is recommended that you let SpywareBlaster protect you for maximum security.
Once again, if you would like to remove one or more of the sites, you can uncheck that particular site and click on the Remove Protection for Unchecked Items button.
Advanced Tip: SpywareBlaster protects Firefox by adding the domain to the cookperm.txt file for Mozilla based browsers. This file is located in the same directory that your prefs.js is located. Domains are added in the form:
domain.com permission
By adding a domain to this list and giving it a permission of 1F, the cookie will be blocked from that domain.
Using the other tools built into SpywareBlaster
In this part of the tutorial I will discuss other tools that SpywareBlaster has built into the program. I will go into detail about each of the different tools below.
System Snapshot
SpywareBlaster has the ability to take a snapshot, or backup, of certain settings in your browser and your registry. These settings will be saved in a database that is stored in your SpywareBlaster directory. If in the future you make a mistake, or things start acting strange, you can restore your configuration from this backup.
The first step is to click on the System Snapshot button on the left. If this is your first time using it, you will want to create a snapshot of your system. You should select the radio button that is labeled Create new System Snapshot and press the Go button. Give the snap shot a name that you will remember and make sure the Append date + time to the end of the snapshot name checkbox is checked. When this is done, press the Create Snapshot button to continue. SpywareBlaster will then save the settings on your computer into a database. When it is done you can press the Finish button.
In the future, if you want to restore this backup you can choose the System Snapshot section and then select the radio button for Restore System to Saved Snapshot Point and press the Go button. You should click once on a snapshot to select it and then press the Next button. If there were any changes from your current settings compared to the ones saved in the snapshot, it will notify you and give you the option to restore them. Otherwise it will tell you there was no difference in your current settings to the ones in the snapshot.
Tools Section
The tools sections contains 5 different tools that you can use on your computer. For most people the only tool I recommend is the Hosts Safe tool. The other tools can cause other Spyware removal tools to view it as a modification made by a Hijacker and should be only used by advanced users.
IE Browser Pages: This tool allows you to change various Browser Pages such as your default Blank Page, or the default search page. Unless you know what you are doing it is recommended that you leave this alone.
Misc IE Settings: This allows you to disable the Internet Tools control panel in your Windows Control Panel. I would leave this unchecked unless you have a good reason. The other option lets you change the text next to the web pages title in your browser windows and is just for cosmetics.
Hosts Safe: This tool is one that I recommend that most users use at least once. This will back up your HOSTS file, which is commonly used by Hijackers, to an encrypted file that can be restored from at a later date. Please use this tool at least once so that you have an available backup.
Flash Killer: This will disable Flash files from being run within your browser. Unless you will never need to use Flash, I would suggest you not use this option as many legitimate sites use flash.
Custom Blocking: This allows you to add custom ActiveX CLSID's that you want to block from running on your computer. This tool should only be used by an advanced user.
Conclusion
As you can see SpywareBlaster is a very powerful tool in the protection against Spyware and Hijackers. Though this tool will not remove Hijackers/Spyware from your system, it will prevent you from getting infected in the future. Therefore, it is highly recommended that you use this tool to its fullest potential and to constantly update it so that you can have protection from the latest threats that may have arisen.
Once again if you have any comments, questions or suggestions about this tutorial please do not hesitate to tell us in the computer help forums.
Users who read this also read:

How to remove a Trojan, Virus, Worm, or other Malware
If you use a computer, read the newspaper, or watch the news, you will know about computer viruses or other malware. These are those malicious programs that once they infect your machine will start causing havoc on your computer. What many people do not know is that there are many different types of infections that are categorized in the general category of Malware.

HijackThis Tutorial - How to use HijackThis to remove Browser Hijackers & Spyware
HijackThis is a utility that produces a listing of certain settings found in your computer. HijackThis will scan your registry and various other files for entries that are similar to what a Spyware or Hijacker program would leave behind. Interpreting these results can be tricky as there are many legitimate programs that are installed in your operating system in a similar manner that Hijackers get ...

Windows Alternate Data Streams
Anyone who is in the security arena should know about Windows Alternate Data Streams, otherwise known as ADS. Though not highly publicized, lack of this little known attribute of the Windows NTFS file system may affect how you solve a problem in the future.

Using Spybot - Search & Destroy to remove Spyware from Your Computer
If you suspect that you have spyware installed on your computer, then an excellent tool called Spybot - Search and Destroy can be used to remove them. Follow the instructions below to learn how to use Spybot - S&D to remove these programs from your computer. Word of warning, though, Spyware can sometimes be integrated tightly into software that you use, and if you remove the spyware, that ...

Safely Connecting a Computer to the Internet
It is exciting to get a new computer. Think of all the applications and games you can now run, the music you can store, and the pictures you can share with friends. Your new computer is delivered, you quickly unpack it, and start plugging it all in. The computer boots up, the desktop appears, and just by clicking on your web browser icon you are suddenly connected to the wide world of the Internet ...
Exposure Key export file format and verification
This document describes the file formats passed into the Exposure Notification API. Applications are responsible for downloading these files from backends and invoking . This document also explains how the files are verified by the API.
File format
Files consist of a ZIP archive containing two entries:
- : The binary containing the exposure keys.
- : A signature to verify the export binary.
Exposure file binary format
The file of the archive contains the Temporary Exposure Keys that are broadcast by the devices of people who are diagnosed with COVID-19. It’s an incremental file containing the latest keys the server received in a given window of time. This window is typically 24 hours, allowing devices to perform nightly matching.
The binary format file consists of a special header followed by a protocol buffer. The header must be exactly “EK Export v1” right-padded to 16 bytes with UTF-8 whitespaces. After the header is the serialization of a protocol buffer message named defined as follows:
If the server stores exposure keys in the order that they were uploaded from devices, shuffle them before you export them. The shuffle ensures that there is no linkage between keys from a device. Since the keys are essentially random, a simple way to do this is to sort by key.
Exposure file signature
The server creates an asymmetric key pair for signing exports. When the app is allowlisted, the public key is provided to Google. The server signs each with a private key. The file of the archive contains the raw signature as well as additional information needed for verification. This key is different from the signing key for the APK.
The signature file is the serialization of the protobuf message defined as follows:
Example
For the most common case of a backend exporting files for consumption by a handful of apps in some region, these archive entries could look as shown in the following example. Assume for the example that the backend serves apps in the U.S. and that splitting the export into multiple files is not needed yet. The files in the archive might look as follows:
export.bin
export.sig
Create batches
These files can grow so big that they become prohibitive to download. This is especially true for devices that don't have Wi-Fi access. You can break up files into batches to keep the file size below 16MB—about 750K keys. Each chunk of data in the batch is its own ZIP archive with its own signature. Each archive covers just a portion of the batch. The serialized protos populate the and fields.
Verification
The API verifies the signature against the content of the exposure binary file. This can be optionally disabled on test devices using the setting in Debug Mode. However, prior to handing over your public key to Google for use in verification it is important to confirm that files are being successfully verified.
The API uses the fields in the signature file to identify which verification key to use for the application. You must verify at least one signature for each ZIP archive in a batch.
The API will also verify either that is equal to 1, or, if greater than 1:
- Pre v1.5:
- There are number of files in the batch and each is present. That is, only one batch has been passed in and it is whole.
- Post v1.5:
- For every batch passed in (identified by grouping by , , , and ), all parts of the batch are present.
- If the files should be cosigned by multiple keys, all are present in the .
The API completes all verification before it invokes and releases the results. You should see "Signature verification succeeded" in the logs. If you do not, matching is not invoked and your app will not properly show exposure notifications.
Reference server export utilities
The reference server design offers a set of utilities to create and verify the file format and the signature.
What’s New in the SpywareBlaster Key Archives?
Screen Shot

System Requirements for SpywareBlaster Key Archives
- First, download the SpywareBlaster Key Archives
-
You can download its setup from given links:

SpywareBlaster Key Archives & for Laptop

SpywareBlaster Key Archives& Key Download
