
License key genymotion Archives

license key genymotion Archives
DevTest Solutions 10.3
- Installing Genymotion requires you to create a Genymotion user account, but the basic download is free. The Windows platform has a combined Virtualbox/Genymotion installer.
- Add your virtual devices.
- Start Genymotion.The first time you start Genymotion, you are prompted to add a virtual device.
- Click Yes.The Create a New Virtual Device window opens.
- Click Connect and enter your Genymotion user ID and password to view available devices.A list of available virtual devices displays. You can filter the list of devices by Android version or device model at the top of the page.
- Select the device you want to add, then click Next.
- Review the details for the selected device.The name of the device is the name you enter in the asset dialog in . You can change the default Genymotion name to a simpler name.
- Click Next.The download of your virtual device begins. These download images are typically around 200MB in size.
- Click Finish when the download is complete.
- To add another virtual device, click Add in the Genymotion main window and repeat the previous steps.You are now ready to record with Genymotion. When you record a test, select Genymotion in the field of the dialog.
- Lists all available virtual devices. The output from this command resembles the following:Nexus 7 - 4.3 - API 18 - 1280x800" {144161dd-750e-4fff-8d46-0da8bc0c226b}GalaxyNexus4.2.2-API17" {d740a4fa-df15-4768-aee1-ffebfb883dc1}Each line is a pair of identifiers. The first identifier is the name you gave the device when you created it. The second identifier is the UID. You can use either identifier when passing devices as targets on the command line. The UID does not need the braces when you are using it on the command line.
- vboxmanage list runningvmsLists the virtual devices that are running.You can perform the same function with the ADK command,$ANDROID_HOME/platform-tools/adb devices.The ADK command lists both Genymotion and ADK emulated devices.The output from this command resembles the following:192.168.0.56:5555 deviceADK devices are prefixed with "emulator." Genymotion devices begin with the IP address. The next number is the port that the device is using.
- player --vm-name <UID or name>Navigate to the path where the device is installed, and use this command to start a virtual device. You can also start a device from the Genymotion interface.
Installing Genymotion
Overview
Genymotion Desktop provides a library of Android virtual machines that run in Oracle's VirtualBox. It is an alternative to the Android SDK's emulators. Genymotion is faster than the Android SDK's ARM-based emulators and more reliable than x86 emulators that use Intel's HAXM technology.
Genymotion is free for personal use, however you can purchase a license for commercial use.
Compatibility and download
Genymotion support is available for Titanium CLI 3.3.0 and later, Titanium SDK 3.3.0 and later, and Studio 3.3.0 and later.
If your app uses any Titanium Modules, they must be compiled for x86 architectures in order for your app to run on Genymotion.
Google's APIs such as Maps and Play Services are not distributed separately , so Genymotion virtual machine images do not include them out-of-the-box. The Google APIs can be found online and once downloaded, can be installed into your Genymotion virtual machine by dragging and dropping the file in the running virtual machine window.
You will need to register for a Genymotion Cloud account. For an updated list of requirements, see Genymotion User Guide: Requirements.
Oracle VirtualBox
Genymotion requires Oracle VirtualBox. If you do not have VirtualBox installed, you can either download a Genymotion installers that includes VirtualBox (recommended) or manually install it.
To manually install VirtualBox, see the following:
- For Mac OS X, go to Download VirtualBox and get the Mac OS X .dmg file. Open the .dmg file and follow the installation steps. When finished, reboot.
- For Windows, Genymotion provides two installers: a ready-to-run installer that provides VirtualBox and a standard installer that does not. Genymotion recommends using the ready-to-run installer. If you want to manually install VirtualBox, go to Download VirtualBoxand get the Windows .exe file. Open the .exe file and follow the installation steps. When finished, reboot.
If you have Intel Hardware Accelerated Execution Manager (HAXM) for Android installed, you may not be able to run VirtualBox. Previously, there have been conflicts with HAXM and VirtualBox.
Genymotion Cloud account
In order to download Genymotion and Genymotion virtual devices, you will need a Genymotion Cloud account. To sign up for an account, visit https://www.genymotion.com/account/login/. You will need to verify your e-mail address before downloading files.
Installation
Mac OS X
- Download the Mac OS X installer (DMG file) from Genymotion.
- Open the installer to launch it.
- Drag the Genymotion.app and Genymotion Shell.app icons to the Applications folder.
- Launch Genymotion.app from the Applications folder.
- The Genymotion application starts. A dialog prompts you to "Add a first virtual device". Click Yes.
- In order to add a virtual device, you need to connect to the Genymotion Cloud service. Click Connect.
- You are prompted to enter your Genymotion Cloud account credentials. Input your credentials, then click Connect.
- After your account has been verified, select a device and click Next.
- Optional: change the name of the device. Click Next.
- Click Finish after the download completes or click Add to download more virtual devices.
Windows
- Download the Windows installer (EXE file) from Genymotion.
- Double-click the installer to launch it.
- Choose a language and click OK.
- Click Next to accept the defaults, then click Install to start the installation process.
- After Genymotion installs and if you chose to use the ready-to-run Genymotion installer, the VirtualBox installer starts.
- Click Next to accepts the defaults, then click Install to start the installation process.
- After the VirtualBox installer completes, uncheck to start VirtualBox, then click Finish.
- The VirtualBox installer disappears and returns to the Genymotion installer. Leave the Launch Genymotion option checked, then click Finish.
- The Genymotion application starts. A dialog prompts you to "Add a first virtual device". Click Yes.
- In order to add a virtual device, you need to connect to the Genymotion Cloud service. Click Connect.
- You are prompted to enter your Genymotion Cloud account credentials. Input your credentials, then click Connect.
- After your account has been verified, select a device and click Next.
- Optionally change the name of the device. Click Next.
- Click Finish after the download completes or click Add to download more virtual devices.
Configuring Genymotion
Titanium CLI
To enable support for Genymotion with the Titanium toolchain, you need to configure the Titanium CLI. If you have not modified the default installation of VirtualBox and Genymotion, you only need to set the value to true with the command. If you are using Studio, restart Studio after updating the CLI configuration.
The table below describes the default locations. If you have a custom installation of either VirtualBox or Genymotion, you need to set the below CLI options in order to use it with the Titanium toolchain.
| CLI Option | Description | Defaults by OS |
|---|---|---|
| Path to Genymotion virtual devices |
| |
| Path to Genymotion |
| |
| Path to Genymotion executable |
| |
| Path to Genymotion executable |
| |
| Path to VirtualBox executable |
|
Studio
Studio uses the configuration settings from the Titanium CLI to support Genymotion. In case the Titanium CLI is unable to detect the settings, you may override these settings in the Preferences dialog.
- Open Preferences:
- For Mac OS X systems, from the menu, select Appcelerator Studio > Preferences.
- For Windows systems, from the menu, select Windows > Preferences.
- In Preferences, navigate to Studio >Platforms > Android.
- In the Genymotion section, update the paths to the executables as needed.

Using Genymotion
Launch a Genymotion virtual device from the CLI
To launch an Android application on a Genymotion virtual device, run the following CLI command:
Where is the name given to the Genymotion virtual device when you downloaded it. To get a complete list of Android virtual devices, run the command. The Genymotion devices are listed at the end right before any warning messages.
Launch a Genymotion virtual device from Studio
Genymotion virtual devices are listed under the same drop-down menu as your Android virtual devices. Follow the same procedure to launch a Genymotion emulator as you would an Android emulator.
For example, to launch a project in run mode:
- Select the project in the Project Explorer view.
- In the global tool bar, select Run from the Launch Mode drop-down list.
- From the Target drop-down list, select Android Emulator then choose a Genymotion virtual device.
- Click the Launch button to start the build process if the Launch Automatically option is not enabled under the Target drop-down list.
In the screen shot below, there are three virtual devices to choose: a user-created Android virtual device, a Genymotion virtual device and an Android virtual device created by the Titanium SDK.

Troubleshooting
I cannot see a list of virtual devices under the Target drop-down list
- In the file of the application you want to run, check to make sure the Titanium SDK is version 3.2.0 or greater.
- Double-check your Studio configuration settings in Preferences.
- For Mac OS X systems, from the menu, select Appcelerator Studio > Preferences.
- For Windows systems, from the menu, select Windows >Preferences.
- Navigate to Studio > Platforms > Android.
Restart adb, then restart Studio. To restart adb, from a terminal, run:
adb kill-server adb start-server
Failed to start daemon
When building an application, if the following error(s) is reported:
or
This indicates the ADB version shipped with Genymotion is out of date with the Android platform tools. To fix this issue, manually set the ADB tool to use in the Genymotion settings:
- Launch Genymotion.
- Click Settings to open the Settings dialog.
- Click the ADB tab.
- Select Use custom Android SDK tools.
- In the Android SDK textbox, enter the path to your Android SDK or click the Browse button to navigate to it.
- Click OK.
Rebuild the application.
Note that if you restart your computer, this setting may not persist in Genymotion and you will need to set the Android SDK path again.
Further reading
Ubuntu: Installing the Genymotion Android emulator
![]() Android is one of the leading platforms of the mobile industry. By installing an Android emulator on your Ubuntu desktop, you can bring this power to your desktop.
Android is one of the leading platforms of the mobile industry. By installing an Android emulator on your Ubuntu desktop, you can bring this power to your desktop.
More often than not, an Android emulator is used for custom development of mobile apps, but don’t overlook its utility as a way to access your favorite mobile applications directly from your desktop, or as a way to preview upcoming Android releases.
There is the official Android Emulator, of course, but for this article we are going with the emulator from Genymotion. This emulator provides a rich set of device choices (Galaxy, Nexus, etc.), disk/RAM resource settings, OpenGL hardware acceleration, sensor management, and other nice features that really set it apart.
Prerequisites
Install Virtualbox
Genymotion leverages virtualization technology to create each Android device, so you must have VirtualBox installed. I have written an article here which fully describes the installation process on Ubuntu.
Install GCC 4.9
This is not mentioned in the official documentation, but your Ubuntu server will need the basic development toolchain and gcc 4.9 installed in order to install Genymotion.
$ sudo add-apt-repository ppa:ubuntu-toolchain-r/test $ sudo apt-get update $ sudo apt-get install gcc-4.9 g++-4.9 -yAlso in order to avoid an error where ‘CXXABI_x.y.z’ is not found when running the installer, issue the following commands.
$ LD_LIBRARY_PATH=/usr/local/lib64/:$LD_LIBRARY_PATH $ export LD_LIBRARY_PATHDownload Genymotion binaries
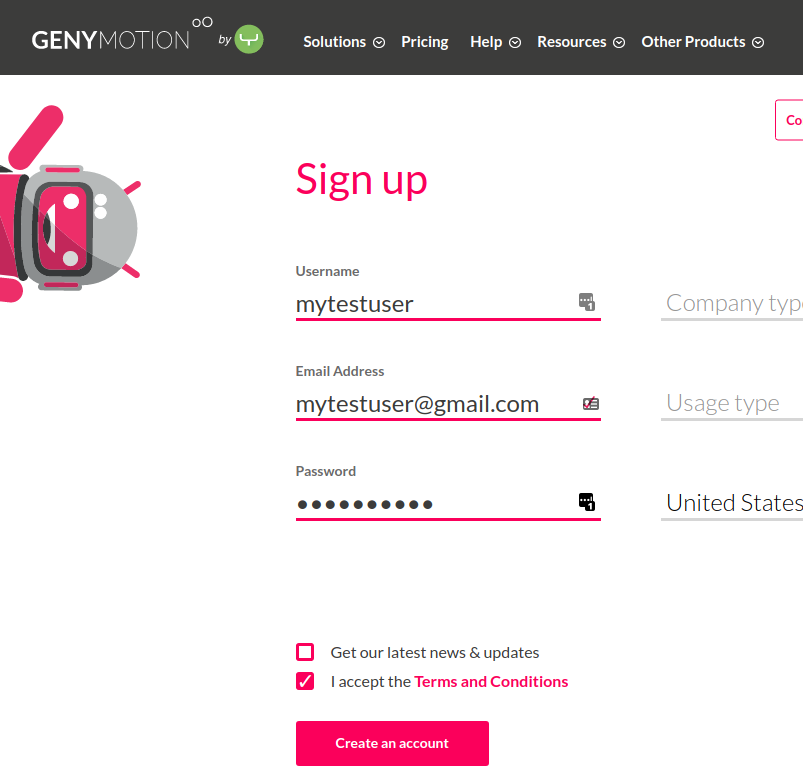
Although Genymotion is free for personal use, you will need to create an account in order to download the software. Go to https://www.genymotion.com, and click on “Sign In” at the top. This will take you to a sign in form, where you can press the “Create an account” button.
Fill in the essential form details, and then press “Create an account” as shown below.
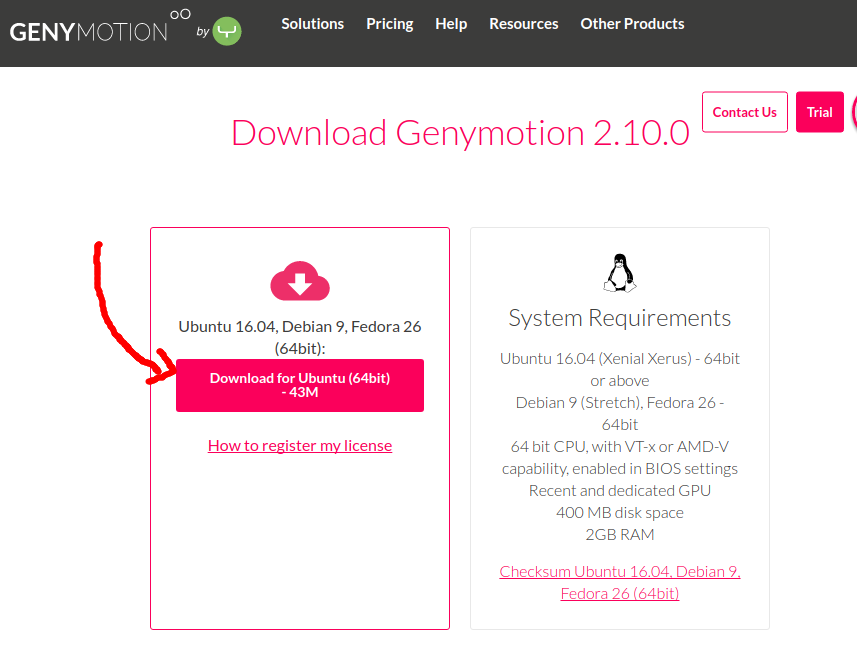
Now that you are signed in, you can download the binaries. The free “personal use only” version can be found by selecting: “Resources” > “Fun Zone” from the top menu or going directly to https://www.genymotion.com/fun-zone/ and clicking on the “Download” button.
At the download page, you will see a button that allows you to download the binaries for your platform. As shown below, these are the Ubuntu 64 bit binaries.
Install Genymotion
Now we can run the installation from the download directory:
$ chmod u+x genymotion-2.10.0-linux_x64.bin $ ./genymotion-2.10.0-linux_x64.binAnd the output will look something like this:
Installing for current user only. To install for all users, restart this installer as root. Installing to folder [/home/fabian/Downloads/genymotion]. Are you sure [y/n] ? - Trying to find VirtualBox toolset .................... OK (Valid version of VirtualBox found: 5.1.18r114002) - Extracting files ..................................... OK (Extract into: [/home/fabian/Downloads/genymotion]) - Installing launcher icon ............................. OK Installation done successfully. You can now use these tools from [/home/fabian/Downloads/genymotion]: - genymotion - genymotion-shell - gmtoolRun Genmotion for the first time
$ cd genymotion $ ./genymotionA dialog will popup asking you to “Sign in or enter a license” or buy a license, click on the button to sign in using the account you created earlier.
As shown below, click on the “Sign In” button and you will have a small dialog window where you should enter in your Genymotion account credentials.
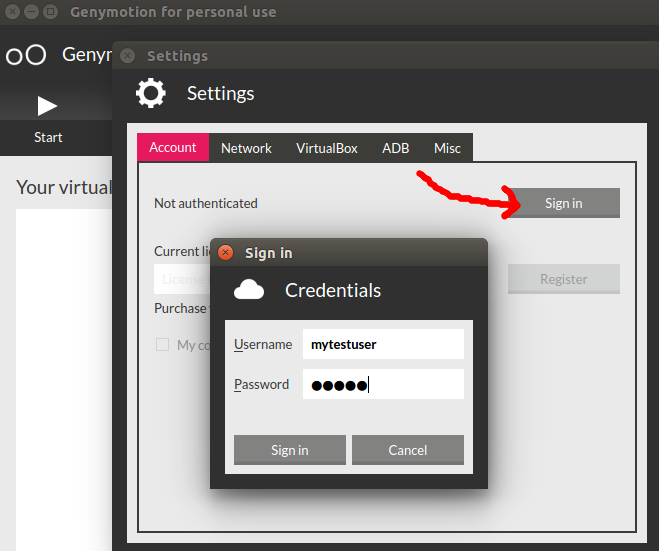
If your credentials are validated, the parent dialog will now say “Current license: Personal use” and you can close the settings dialog.
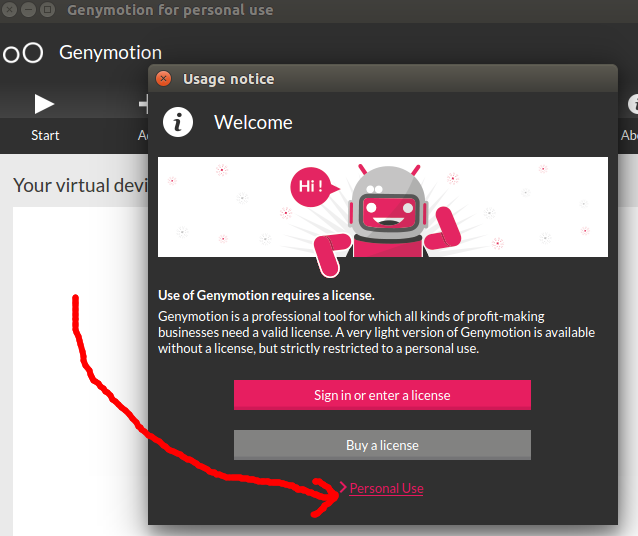
Now you will be presented with a “Usage notice” dialog, click on the “Personal Use” link at the bottom (as shown below) and you will be presented with a EULA screen where you can check the box and press “Accept”.
Create new device
With all these initial licensing steps and EULA acceptance out of the way, now you can create a virtual Android device.
Click the “+” Add icon to create a new device and a dialog with a long list of available devices will be shown. This includes generic custom phones/tables with Android 4.x up to the latest release, Google Nexus, NTC, HTC, Pixel, Motorolla, and Samsung.
Chose your favorite, I’m going to choose a custom phone with Android 7.1.0 for this example, click “Next” a couple of times and Genymotion will take care of downloading (takes a few minutes) and then deploying the virtual device. When complete, it will show a success message.
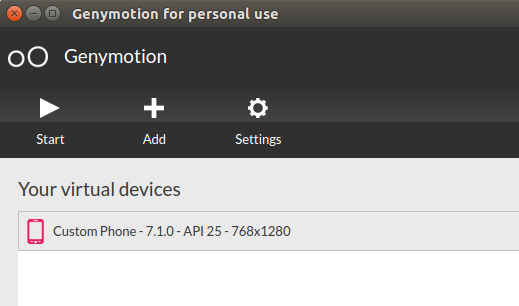
Click on the virtual device you just created as shown below, and then press “Start”.
Genymotion will then spin up a new virtual device, and you should see a screen similar to the one shown below. Which is exactly what you would expect on a physical Android device. There are function buttons to the right of the virtual screen that allow you to control GPS, networking, volume, power buttons, etc.
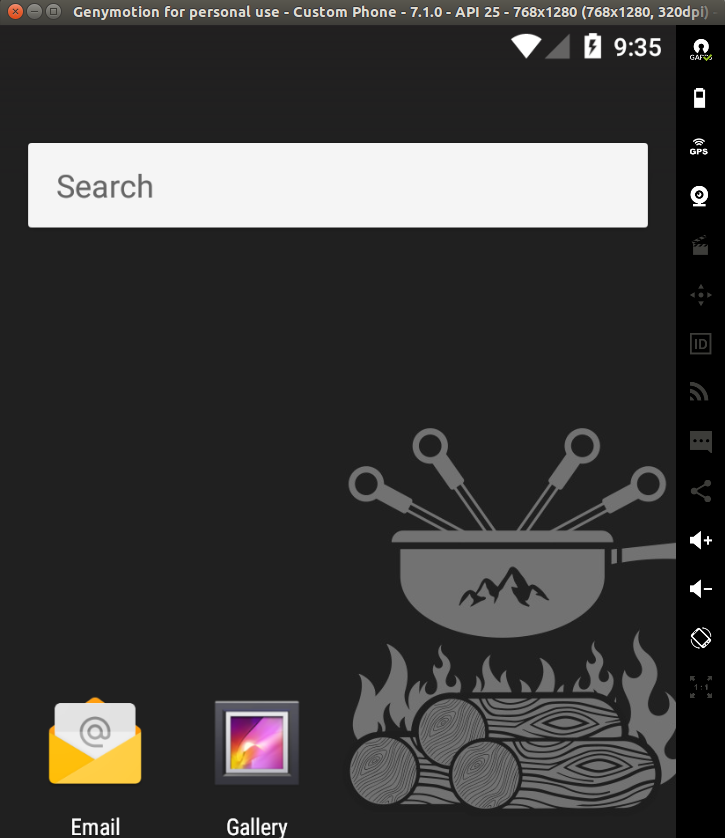
But what is conspicuously absent from this virtual device is the Google Play Store or other Google apps. I believe this is due to Google only wanting to license Google Play preloaded for physical devices.
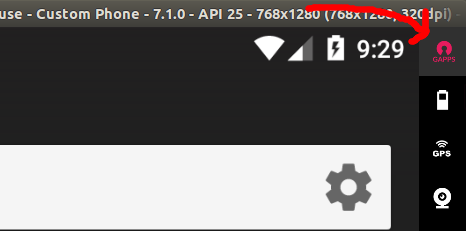
In order to get Google Apps installed, simply click on the top right-most icon labled “GAPPS” as shown below.
After installation, restart the device by holding the power button down for 3 seconds (bottom icon).
After restart, you will have an icon to the Google Play Store, sign in with your Google credentials and now you have access to run all apps available from Play Store. For example, if you install Google Play Center and the game “Clash Royale” you get the full playing experience using your mouse.

REFERENCES
https://www.genymotion.com/fun-zone/
https://www.genymotion.com/download/
https://docs.genymotion.com/Content/01_Get_Started/License/Registering_the_license_key.htm
https://www.genymotion.com/blog/2-10-open-gapps-widget/ (2.10 has 1-button for install of Google Play)
https://github.com/codepath/android_guides/wiki/Genymotion-2.0-Emulators-with-Google-Play-support (pre 2.10 manual install of Google Play services)
http://techapple.net/2014/05/5-best-android-emulators-linux-run-android-apps-linux-ubuntulinuxmintfedoraarchlinuxopensusemageiacentos-etc/
ERROR: /usr/lib/x86_64-linux-gnu/libstdc++.so.6: version `CXXABI_1.3.8′ not found (required by /home/fabian/Downloads/genymotion/player)
https://stackoverflow.com/questions/37817792/how-to-fix-genymotion-in-linux-elementaryos-with-error-cxxabi-1-3-8-not-found
https://stackoverflow.com/questions/20357033/how-to-fix-program-name-usr-lib-x86-64-linux-gnu-libstdc-so-6-version-cxx
What’s New in the license key genymotion Archives?
Screen Shot

System Requirements for License key genymotion Archives
- First, download the License key genymotion Archives
-
You can download its setup from given links:

license key genymotion Archives & PC Free Download

license key genymotion Archives& PC Free Download
