
Xampp new version free download for windows Archives

xampp new version free download for windows Archives
XAMPP
| Stable release | 7.4.10 / September 12, 2020; 1 day ago (2020-09-12) |
|---|---|
| Repository | sourceforge.net/projects/xampp |
| Operating system | |
| Platform | IA-32 (Windows package only) and x64 (macOS and Linux packages only) |
| Size |
|
| Available in | 11 languages[citation needed] |
| Type | Solution stack |
| License | GNU General Public License |
| Alexa rank | |
| Website | www.apachefriends.org |
XAMPP (/ˈzæmp/ or /ˈɛks.æmp/)[2] is a free and open-sourcecross-platformweb serversolution stack package developed by Apache Friends,[2] consisting mainly of the Apache HTTP Server, MariaDBdatabase, and interpreters for scripts written in the PHP and Perlprogramming languages.[3][4] Since most actual web server deployments use the same components as XAMPP, it makes transitioning from a local test server to a live server possible.
XAMPP's ease of deployment means a WAMP or LAMP stack can be installed quickly and simply on an operating system by a developer, with the advantage that common add-in applications such as WordPress and Joomla! can also be installed with similar ease using Bitnami.
Etymology[edit]
The term XAMPP is an apparent acronym. However, there is no official acronym expansion specified on the Apache Friends website. Their homepage header reads "XAMPP Apache + MariaDB + PHP + Perl", indicating that this abbreviation is a recursive acronym.
The term can be unofficially broken down as follows:
MySQL was replaced with MariaDB on 19 October 2015 and beginning with XAMPP versions 5.5.30 and 5.6.14,[7] effectively altering the meaning of the acronym.
While both letters P are de facto interchangeable, convention used at the Apache Friends website indicates that the first letter P is short for PHP and the latter letter P is short for Perl.
Prerequisites[edit]
XAMPP requires only one zip, tar, 7z, or exe file to be downloaded and run, and little or no configuration of the various components that make up the web server is required.[8] The Windows version of XAMPP requires Microsoft Visual C++ 2017 Redistributable.
Features[edit]
XAMPP is regularly updated to the latest releases of Apache, MariaDB, PHP and Perl. It also comes with a number of other modules including OpenSSL, phpMyAdmin, MediaWiki, Joomla, WordPress and more.[9] Self-contained, multiple instances of XAMPP can exist on a single computer, and any given instance can be copied from one computer to another.[10] XAMPP is offered in both a full and a standard version (Smaller version).[10]
Usage[edit]
The most obvious characteristic of XAMPP is the ease at which a WAMP webserver stack can be deployed and instantiated.[11] Later some common packaged applications that could be easily installed were provided by Bitnami.[12]
Officially, XAMPP's designers intended it for use only as a development tool, to allow website designers and programmers to test their work on their own computers without any access to the Internet. To make this as easy as possible, many important security features are disabled by default.[13] XAMPP has the ability to serve web pages on the World Wide Web.[14] A special tool is provided to password-protect the most important parts of the package.[15]
XAMPP also provides support for creating and manipulating databases in MariaDB and SQLite among others.
Once XAMPP is installed, it is possible to treat a localhost like a remote host by connecting using an FTP client. Using a program like FileZilla has many advantages when installing a content management system (CMS) like Joomla or WordPress[further explanation needed]. It is also possible to connect to localhost via FTP with an HTML editor.
Components[edit]
| Component | On Windows | On Linux | On macOS |
|---|---|---|---|
| Apache 2.4.46 | Yes | Yes | Yes |
| MariaDB 10.4.14 | Yes | Yes | Yes |
| PHP 7.4.10 | Yes | Yes [17] | Yes [17] |
| phpMyAdmin 5.0.2 | Yes | Yes | Yes |
| OpenSSL 1.1.1g | Yes | Yes | Yes |
| Webalizer | Yes - 2.23-04 | Yes - 2.23-05 | Yes - 2.23-05 |
| FileZilla FTP Server 0.9.41 | Yes | No | No |
| Mercury Mail Transport System 4.63 | Yes | No | No |
| Strawberry Perl 5.32.0.1 Portable | Yes | No | No |
| Tomcat 7.0.105 (with mod_proxy_ajp as connector) | Yes | No | No |
| XAMPP Control Panel 3.2.4 | Yes | No | No |
| APR 1.5.2 | No | Yes | Yes |
| APR-utils 1.5.4 | No | Yes | Yes |
| cUrl 7.53.1 | No | Yes | Yes |
| expat 2.0.1 | No | Yes | Yes |
| FPDF 1.7 | No | Yes | Yes |
| FreeTDS 0.91 | No | Yes | Yes |
| Freetype2 2.4.8 | No | Yes | Yes |
| GD 2.2.5 | No | Yes | Yes |
| gdbm 1.8.3 | No | Yes | Yes |
| gettext 0.19.8.1 | No | Yes | Yes |
| ICU4C Library 66.1 | No | Yes | Yes |
| IMAP C-Client 2007e | No | Yes | Yes |
| libapreq 2.13 | No | Yes | Yes |
| libpng 1.5.26 | No | Yes | Yes |
| libxml 2.0.1 | No | Yes | Yes |
| libxslt 1.1.33 | No | Yes | Yes |
| mcrypt 2.5.8 | No | Yes | Yes |
| mhash 0.9.9.9 | No | Yes | Yes |
| Ming 0.4.5 | No | Yes | Yes |
| mod_perl 2.0.8-dev | No | Yes | Yes |
| ncurses 5.9 | No | Yes | Yes |
| OpenLDAP (client) 2.4.48 | No | Yes | Yes |
| pdf class 0.11.7 | No | Yes | Yes |
| Perl 5.30.3 | No | Yes | Yes |
| ProFTPD 1.3.6 | No | Yes | Yes |
| Sablotron 1.0.3 | No | Yes | Yes |
| zlib 1.2.11 | No | Yes | Yes |
See also[edit]
References[edit]
XAMPP 32 Bit Download for Windows XP, Vista, 7, 8 and 10

Download XAMPP 32 bit for the Microsoft Windows, Apple Macintosh, and Linux distribution along with 64-bit architecture that we have archived on our website since the Apache Friends community no longer maintains the 32-bit architecture. Also, you can download XAMPP 32-bit and 4-bit architecture for Microsoft Windows XP, Windows 7, Windows 8, Windows 8.1, and of course, the latest operating system from the Microsoft Corporation, Windows 10. Apart from XAMPP, there are several popular web server applications that we have covered in detail in 10 Best Alternatives Of XAMPP Servers For Windows, Linux And macOS.
Contents:
1. What is XAMPP software?
2. Download XAMPP 32-bit for Windows
3. Download XAMPP 64-bit for Windows
4. Download XAMPP 32-bit and 64-bit for Linux distributions
5. Download XAMPP 32-bit and 4-bit for Apple Macintosh
What is XAMPP software?
XAMPP acronym Cross-Platform Apache MySQL PHP and Perl is an open-source web application developed by Apache Friends Open Source Community is a collection of web applications like Apache, PHP, Apache Tomcat, MySQL, MariaDB, PHPMyAdmin and Perl that let you create a local web server and develop website on the platforms PHP, Perl, and JSP. You can also install XAMPP on the live servers to run developmental or production sites.
The best thing about XAMPP from Apache Friends is, it supports multiple Operating Systems (OS), including Microsoft Windows, Linux distributions, and the Apple Macintosh OS.
XAMPP is available for the 64-bit as well as 32-bit architectures, but on the official website of the XAMPP, Apache Friends only 64-bit architecture installer is available to download. Where, the beginners trying their hand on the web development are getting error 216 while installing 64-bit XAMPP on the 32-bit architecture whereas, no direct download link for 32-bit architecture is available on the official website of the XAMPP.
Unable to launch “xampp-windows-x64..installer.exe” error code=216. If you are trying to install the application, then please save it and launch outside of browser sandbox environment.
Are you getting api-ms-win-crt-runtime-l1-1-0.dll is missing? Here is the XAMPP Quick fix for api-ms-win-crt-runtime-l1-1-0.dll is missing.
How to download XAMPP 32-bit architecture for the Windows operating system?
You can download XAMPP 32-bit architecture for the Microsoft Windows operating system like Windows XP, Windows Vista, Windows 7, Windows 8, Windows 8.1, and Windows 10 from the official XAMPP repository (sourceforge.net/projects/xampp) or from the Isrg KB official XAMPP archive.
Some developers have reported that on installing XAMPP on Windows XP and other Windows distributions they are getting “api-ms-win-crt-runtime-l1-1-0.dll is missing” which is caused by an outdated Windows operating system that can be resolved by updating the Windows or installing the older version of XAMPP that we have covered in detail in XAMPP Quick fix for api-ms-win-crt-runtime-l1-1-0.dll is missing.
Download XAMPP 64-bit for Windows
XAMPP 64-bit architecture for Windows 7, Windows 8, Windows 8.1, and Windows 10 can be downloaded from the official website of XAMPP (apachefriends.org), where the Apache Friends, the open-source community maintains the stack.
An alternative to this you can download from the XAMPP repository maintained at sourceforge.net/projects/xampp.
Download XAMPP 32-bit and 64-bit for Linux distributions
The best thing about the XAMPP is it is an open-source software package and supported by all the major operating systems, including the most of the Linux distributions such as Linux Mint, Linux Ubuntu, Redhat Enterprise and Redhat CentOS.
You can download the XAMPP 32-bit for Linux distributions from the official XAMPP repository (sourceforge.net/projects/xampp) or from the Isrg KB official XAMPP archive where the 64-bit architecture can be downloaded from the apachefriends.org.
Download XAMPP 32-bit and 4-bit for Apple Macintosh
Be it the open-source operating system based Linux distributions, affordable closed-source Microsoft Windows operating system, or the highly expensive premium Apple Macintosh Operating systems, XAMPP is available for all the major platforms.
You can download the XAMPP 32-bit for Apple Macintosh Operating systems from the official XAMPP repository (sourceforge.net/projects/xampp) or from the Isrg KB official XAMPP archive where the 64-bit architecture can be downloaded from the apachefriends.org.
Here are direct download links for the XAMPP 32-Bit architecture:
You can download the XAMPP 64-bit installer directly from its website.

Complete install packages for Windows
Complete install packages are available from Moodle.org's Windows download page and also from Bitnami stacks. The packages are designed for new installations on a standalone computer. All them use the popular XAMPP Apache Friends packages. The complete install package can be used on a server, but it is not recommended that it be used as a production site. Please note Moodle.org's Standard install packages only contain the Moodle code.
This document provides instructions for using the Windows packages. Separate instructions are available for Mac OS X packages.
The complete install packages allow Moodle to be installed, along with the prerequisites that includes a web server, Apache, database, MySQL, scripting language, PHP and Moodle all wrapped in the Xampp-lite shell. Several versions of the complete install package are available. The instructions on the download page provide guidance on which version is likely to be most suitable.
In short, complete install packages are designed to create a matched webserver and Moodle site on a standalone computer with minimal effort.
System requirements
- 256 MB RAM (minimum), 1GB RAM (recommended)
- 500 MB free Fixed Disk (more space will be needed depending on user uploads)
- For old versions of Moodle:
- Windows 98/ME (minimum)
- Windows NT/2000/XP/2003 (recommended)
- For Moodle 3.1 and later versions:
- Windows Vista/7/8/10/2008/2012
- Microsoft Visual C++ 2015 Redistributable package is required for PHP (download link). This must be the vc_redist.x86.exe download as the PHP build is 32-bit.
Port 80 Conflict if Skype is already installed
As the Moodle Windows package uses the same port (80) as Skype does, it will not work if the computer has Skype already installed.
The fix is very simple: Exit Skype (don't just close the window), then start the Moodle Windows package. Once Moodle for Windows is running, it should be safe to start Skype again. If the local Moodle is using the port 80, Skype will automatically select a different port when it is run.
Vista and Windows 7/8/10
Packages generated for Moodle 3.1 and later versions should work with Vista/7/8/10 out of the box. They include PHP 7 and MariaDB instead of MySQL, resulting in a smoother experience than previous versions of the packages.
If you have Windows 7, you must check if you need to increase Apache default stack size.
People facing problems with the new packages are advised to:
- Check the PC with a good antivirus. Be very cautious when choosing a free/paid Windows antivirus. Good places to look for are old, reliable, solid PC magazines and old, reliable, solid PC blogs. Beware of many malicious malware programs posing as antivirus solutions! Google for any chosen solution before installing it.
- Check the problem text: If it says that the connection was reset, read this documentation page for diagnosis and fix.
- Read the Requirements and Troubleshooting information, both here and in the package's README.txt file.
- Report any consistent problem in the Moodle Tracker, so it can be investigated and, hopefully, fixed.
- Consider installing a virtual machine (eg, VirtualBox) with a windows or linux LAMP stack and then install Moodle there.
- Switch to:
- Use other Moodle-ready alternatives out there.
Install complete package process
The complete install package is a zip file that contains a webserver called Apache, plus Moodle and Moodle's required MySQL database and PHP program.
There are three basic parts to the this install process.
- Download and unpack the complete install package.
- Start the webserver.
- Install Moodle using a web browser.
First create file structure
Download the package
Download Windows packed-zip file from Moodle.
Unpack the package
Unpack (extract files by clicking on) the zip file you downloaded to a drive or partition of your choice. The extract process will create three files ("Start Moodle", "Stop Moodle", and "README") and a subfolder called "server".
- Do NOT rename the "server" subfolder
- Note: There will also be a folder under this server subfolder, called \moodle that holds the Moodle program.
- TIP: Create a folder and extract the files there. For example, you might have one folder called Moodle254 and another one called Moodle281 for different versions or purposes.
- TIP: Make path to "server" subfolder simple. Best way if it will be in drive root. Like "D:\moodle281\server". A long path, especially with any strange symbols, can prevent XAMPP from working properly.
- NOTE: If you will be installing a server with a language other than English, the install process will need to download the corresponding language pack, which will take some time, and you will likely get a script timeout error. To prevent this, you will need to edit the server/php/php.ini file and change the line that has 'max_execution_time = 30' into 'max_execution_time = 600'.
Second - start the webserver
Now you are ready to start the webserver. Use the "Start Moodle.exe" file which you should find in the top directory. Once the "Start Moodle.exe" program is open, don't close it; use "Stop Moodle.exe" for that purpose.
- Note: These programs control both Apache and MySQL programs that operate the webserver. Some sites will individually start and stop Apache and MySQL with the Xampp bat files found in the "server" subfolder.
- Tip: Alternatively, on a standalone computer with several potential webservers that might be running, you can use the "xampp_restart.exe" file in the "server" subfolder.
- Tip: You can also add shortcuts to the commands that start and stop the site in your Windows "start" menu.
Now you are ready to start the Moodle installation.
- Warning: Windows XP requires the msvcr71.dll library file in order to run Xampp. Installing the .Net 1.1 framework (not .Net 2.0 and upper) could resolve it. You can also search for the file on Google, download it and copy it into the server/apache/bin folder.
Third - start Moodle installation
Start your web browser and type localhost, or http://127.0.0.1 or http://localhost in the address bar. You will either start your first time Moodle installation or if it is already installed you will enter the Moodle site's Front Page or Login screen.

- Tip: After Moodle installs, put the site in your "favorites" or as a "bookmark" in you browser.
Set language
The initial install page will be displayed after you type "localhost".
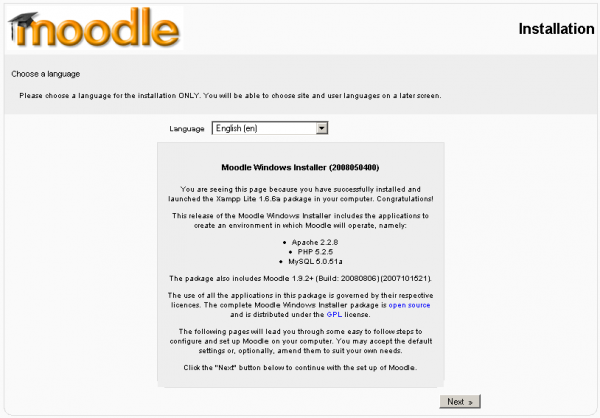
- Choose your preferred language (English is used in this example) and click the “Next” button.
Diagnostic results
A diagnostic report is displayed – hopefully it will look like this, if not you may need to address some issues.
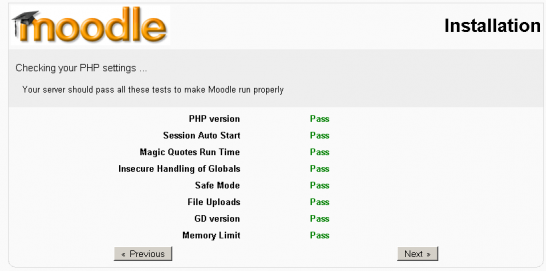
- Click the “Next” button to continue.
Moodle paths
The paths for your Moodle installation are shown – if you are only using this as a local testing server, accept the ones that are shown on your screen.
What you enter in the "Web Address" field depends on what you intend to use the new Moodle installation for. If you are just going to use it for local testing, then use 'http://localhost'. If you are going to test the new installation on a LAN, and will be accessing it from other machines on that LAN, then put the private IP address or network name of the serving machine, followed by a forward slash and moodle: Web Address - http://192.168.1.1/moodle If you are going to test the installation on the internet, then you will need to put the public ip address followed by a forward slash and moodle: http://your_ip_address/moodle or you can put your domain name here instead.
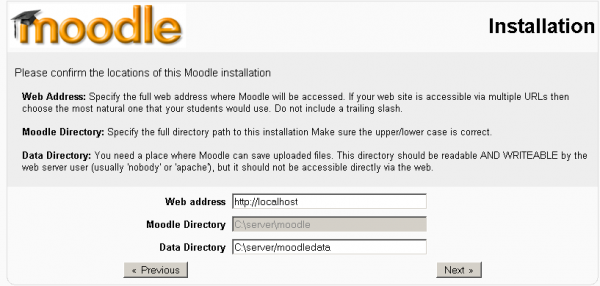
- Click the “Next” button to continue.
Database configuration
- In the next fields, we enter the database settings. The fields are populated with some suggested values.
- We strongly recommend you place a user name and password in this screen. (Don't forget them).
- DO NOT USE THE “ROOT” USER WITHOUT A PASSWORD FOR PRODUCTION INSTALLATIONS AS THIS CREATES A SECURITY VULNERABILITY
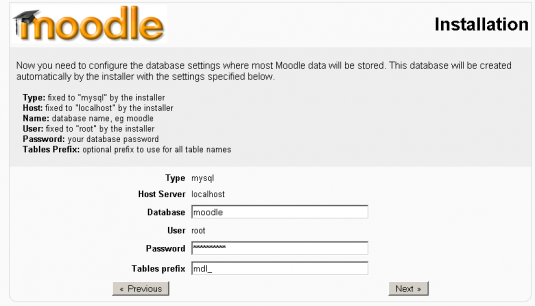
- When the fields have been populated, click the “Next” button to continue.
Check server
The install process checks the server is installed. All the checks should pass as far as the system requirements have been fulfilled.
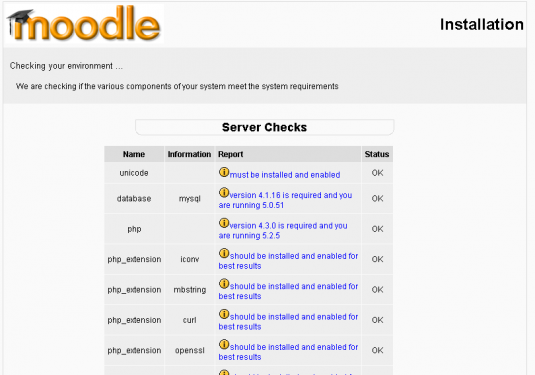
- Click the “Next” button to continue.
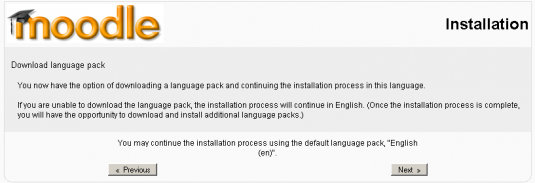
Confirm initial language pack
Moodle will now check to see if the language pack is available for the language you selected at the first step. If it is not, Moodle will continue with the install in English.
Confirm config.php
Provided the Moodle folder is writable, a message confirming the configuration has been completed will be displayed.
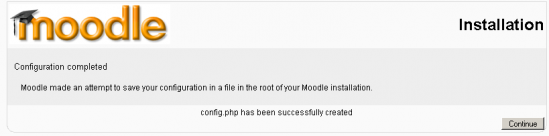
- Click the “ Continue” button to proceed.
Moodle copyright & agreement
The Moodle copyright / license notices are displayed.
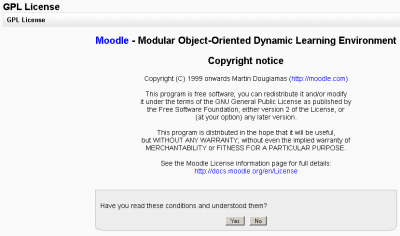
- Click the “Yes” button to continue.
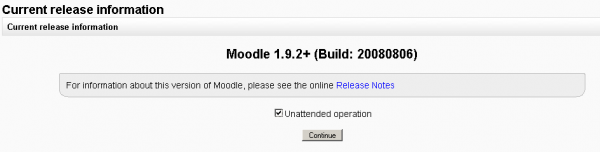
Current release and unattended option
The current release information is shown. Check off the unattended operations box. This will automatically advance through many screens. If you would like to watch the install screen by screen, do not check this box and be prepared to press the "continute button" many times.
- Click the "Continue" button and wait.
Installation modules and blocks screens
In most cases this will be followed by a series of screens that have a continue button on the bottom. This process stops with Admin user profile settings which needs to be filled out.
Administrator user profile
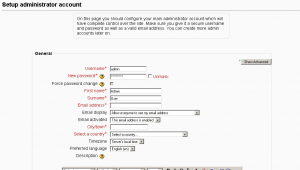
Fill out the required fields.
- Click on "Save" to continue
Front page settings
The next screen is the Front Page settings page. There are two parts to it. The first part will ask for your Full site name and a short name for the navigation bar. There is also a place for a description. You can change these later.
The second part on the bottom instructs Moodle if you will disable the new user self authentication through email process. The default is to disable. This can be changed later in the site administration block.
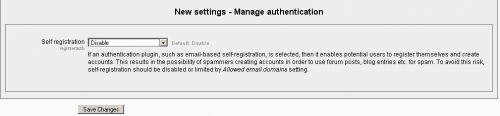
- Click on "Save changes" button to go to Moodle sites home page.
Moodle on
Now you are ready to Moodle !
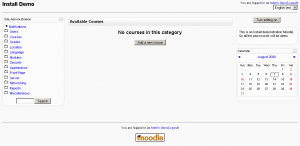
The Site Administration block is on the left, the "Turn edit on" button in the upper right corner, withe the site description block just below it.
Congratulations - Moodle has been installed
This finishes the installation of a complete package. Type http://localhost (or what ever you set for web address earlier in the setup!) in your browser and Moodle will open.
Your next task will be to configure Moodle to meet your needs. Don't worry, it is easy to change any of the settings now that Moodle is up and running.
- Check Settings > Site administration for further links.
More tips and cautions
- For installation on a Windows 2000 or Windows 2003 production server it is good practice to perform a manual install (see the manual installation section in Windows Installation).
- After installing the Windows package, you may wish to add additional contributed modules and plugins. These may involve more customization of configuration files.
- The latest complete install package version components, may not be backwardly compatible. Always check version compatibility of each component if you intend to develop materials on a later version of Moodle than the version installed on your "main" Moodle site. In short, complete install packages are designed for first time install on a "clean" machine.
Security matters (A MUST READ!)
As mentioned before, XAMPP is not meant for production use but only for developers in a development environment. The way XAMPP is configured is to be open as possible and allowing the developer anything he/she wants. For development environments this is great but in a production environment it could be fatal. Here a list of missing security in XAMPP:
The MySQL administrator (root) has no password. The MySQL daemon is accessible via network. Examples are accessible via network.
To fix most of the security weaknesses simply call the following URL:
http://localhost/security/
The root password for MySQL and also a XAMPP directory protection can be established here.
Note that on the Windows installer package, some (all?) of these issues have been fixed already by default and the above link does not work.
If in doubt, more info is here
Apache and MySQL tweaks
Most of the time it is not necessary to tweak Apache or MySQL after completing the complete install package. Nor is it necessary to individually start and stop them because that is what the Xampp_start, Xampp_restart and Xammp_stop files are for.
Installing Apache and MySQL as services
(This is only for NT4 | Windows 2000 | Windows XP operating systems)
\xampplite\apache\apache_installservice.bat = ==> Install Apache 2 as service
\xampplite\apache\apache_uninstallservice.bat = ==> Uninstall Apache 2 as service
\xampplite\mysql\mysql_installservice.bat = ==> Install MySQL as service
\xampplite\mysql\mysql_uninstallservice.bat = ==> Uninstall MySQL as service
==> After all Service (un)installations, please restart your system!
Apache Notes
You can use the apache_start and apache_stop bat files to start and stop apache from running. However the Xampp_start or Xampp_restart and Xampp_stop is recommended to turn on/off both Apache and MySQL.
Troubleshooting
If you find that Apache is very flaky, with the page often not loading properly or even at all (especially on localhost), try adding these lines to the end of C:\your_moodle_installer_directory\apache\conf\httpd.conf
EnableSendfile Off EnableMMAP Off Win32DisableAcceptExIf You edit some .php files but browser still show old state of them, try to disable eAccelerator extension in \server\php\php.ini
[eAccelerator] ;extension=eaccelerator.dllMySQL notes
Again, the recommendation to start and stop the entire webserver is to use the xampp_start or Xampp_restart and the Xampp_stop. The following maybe useful if you wish to tweak the system further. Please be careful.
(1) The MySQL server can be started by double-clicking (executing) mysql_start.bat. This file can be found in the same folder you installed xampp in, most likely this will be C:\xampplite\. The exact path to this file is X:\xampplite\mysql_start.bat, where "X" indicates the letter of the drive you unpacked xampp into.This batch file starts the MySQL server in console mode. The first intialization might take a few minutes.
Do not close the DOS window or you'll crash the server! To stop the server, please use mysql_shutdown.bat, which is located in the same directory.
(2) To use the MySQL Daemon with "innodb" for better performance, please edit the "my" (or "my.cnf") file in the /xampplite/mysql/bin directory or for services the c:\my.cnf for windows NT/2000/XP. In that director, activate the
"innodb_data_file_path=ibdata1:30M"statement. Attention, "innodb" is not recommended for 95/98/ME.
- To use MySQL as Service for NT/2000/XP, simply copy the "my" / "my.cnf" file to C:\my, or C:\my.cnf. Please note that this file has to be placed in C:\ (root), other locations are not permitted. Then execute the "mysql_installservice.bat" in the mysql folder.
(3) MySQL starts with standard values for the user id and the password. The preset user id is "root", the password is "" (= no password). To access MySQL via PHP with the preset values, you'll have to use the following syntax:
If you want to set a password for MySQL access, please use of mysqladmin. To set the password "secret" for the user "root", type the following:
\xampplite\mysql\bin\mysqladmin -u root password secretHave a lot of fun! Viel Spaß! Bonne Chance!
If you are installing Moodle complete install package under Windows 7
See also
What’s New in the xampp new version free download for windows Archives?
Screen Shot

System Requirements for Xampp new version free download for windows Archives
- First, download the Xampp new version free download for windows Archives
-
You can download its setup from given links:

xampp new version free download for windows Archives & Crack

xampp new version free download for windows Archives& Apps for Laptop & PC Free Download
