
Kasa App For PC Archives

Kasa App For PC Archives
Phil Sorrentino, The Computer Club, Florida
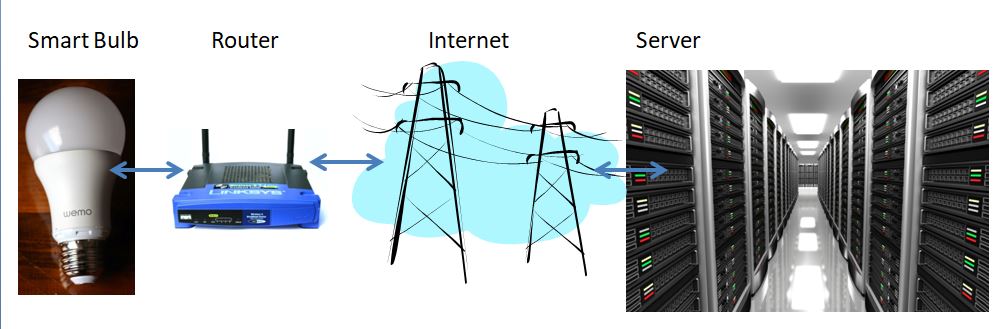
There are a whole host of smart devices available for use in the home now. Some of the most basic and least expensive ones are smart bulbs, smart plugs and smart cameras. (Yes, I know cameras can be expensive, but there are some fairly inexpensive indoor-only cameras.) First of all, what makes these devices smart? Well as I have alluded to in previous articles, it’s all about Client – Server technology. The devices have some limited intelligence in them. Read “intelligence” as basic processing power, downloadable firmware, and wi-fi electronics. This allows them to be able to communicate with a local wi-fi router, which in turn allows them to access the internet. Once they can access the internet, they can take advantage of the servers on the internet (sometimes referred to as “in the cloud”). The intelligence in the accessed server is where all the magic happens. Here read “intelligence” as very fast, very powerful, server computers capable of handling millions of requests for service per second. So it’s the combination of the smart device, the internet, and the server that really makes the smart device: smart.
Once you have your smart device ready for installation, it is the App on your smartphone that takes over and steps you through the installation process. (Yes, a smartphone is required for the installation, either Android or Apple.) The App that you will use for installation will be the App from the specific smart device manufacturer. So for example, if you have a TP-Link smart bulb, you would have to get the TP-Link App for your smartphone. In this example that would be the “Kasa” App. Similarly, if you have a Wyze smart bulb you would use the Wyze App for the installation. These Apps are free and are intended to work with the servers from the specific manufacturer. (So just as an aside, think about this. If the company that operates the server, the smart device manufacturer, goes under and the server goes away, your smart device will no longer be smart. The bulb may not even be able to be turned on if there is no server to command it to turn on.)
The installation process is usually pretty easy; after all, it’s the App that is doing all the work. The first thing you have to do is get the device ready for installation. The App will usually start this by having you select something like “add a device,” or “add a product”, or maybe you just have to select the “+” on the screen (as found on the Kasa App) to add a device. You will have to let the App know what type of device you are adding. This is usually done by just selecting the device type from a list of device types manufactured by that specific manufacturer. Once the device type is selected, you are ready to go into the setup mode. The App will give you instructions for getting the device into the “Setup” mode. On a smart plug with a push-button switch it is really easy because pushing the button as directed by the App will get the smart plug ready for installation. With a smart bulb, usually you quickly turn the power on and off maybe three times and the smart bulb goes into the Setup mode. You will know the device is in setup mode when whatever you were watching changes. With a smart bulb, the light may start to pulsate slowly, with a smart plug, the small light on it may blink or change color. Once the device is in the setup mode, it will need to know the name of your wi-fi network and the password for that network. (Note: some devices only support 2.4 GHz networks only; not 5 GHz networks.) You may have to use your “Settings App” on the smartphone during the setup; just follow the directions from the App. Once you enter the wi-fi network name and the network password you may see a timer count down for a few seconds till the installation is complete. Finally you will be asked to name the smart device; something like “desk light” or “bedroom plug”. (Keep in mind that each manufacturer’s App will be a little different, this is just a general example.) The installation may seem complex but after you have done it once or twice it will probably become automatic. However, you might want to keep those instructions that you get with the device in a safe, convenient, place because you might have to go through the whole process again. (Before I lose the instructions, I scan them into a file and place the file in a “Home Automation” folder so I can review the directions when I have to do another installation. This was recently necessary when I changed my router and the new wi-fi network had a new name and new password. This forced me to reinstall every device that used the house wi-fi. At the time, I had 7 smart devices that had to be reinstalled.) So now with the smart device installed you can control it from your smartphone App. Typically, you can turn it on and off and maybe even set up a schedule.
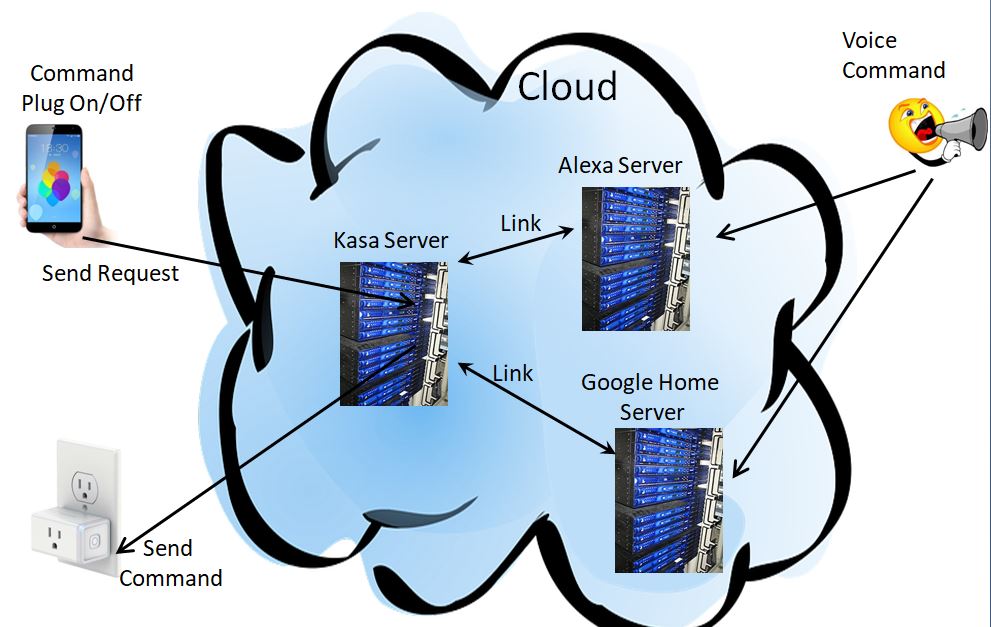
Once the device is installed and working, it’s time to move on to voice control. Voice control is supported by Amazon’s Alexa and Google’s Google Home. You can use either of these or both. Amazon calls the link between Alexa and smart devices “skills.” Google Home refers to them as links. In either case you need to have the appropriate App on your smartphone; the “Amazon Alexa” App for Alexa, and the “Home” App for Google Home. Again, the Apps are free and available for Android and Apple. Once you have the appropriate App, you just have to follow the instructions to link your smart device. Typically you will have to select the type of device and the device manufacturer. On Alexa this is started by selecting the “+” on the “Devices” screen and then selecting “Add device,” and then the type of device, and then selecting the manufacturer of your device from a list of manufacturers. To make sure you are linking “your Alexa” to “your smart device,” the App will require the Username and Password for the manufacturer of your smart device. (So, as a general rule, make sure you know the Usernames and Passwords for all of the manufacturers of the smart devices that you use.) Once you have authenticated yourself with your Username and Password, a link will be made between the Alexa server and the smart device manufacturer’s server. And now you can control the smart device, at least to the extent that the skills allow, by voice control. Now enjoy the feeling of power.


Category: CCTV Apps for PC
Kasa Smart for PC, Windows 10/8/7 and Mac Laptop – Download Free

360eyes Pro for PC, Windows 10,8,7 and Mac Laptop

Easyviewer Lite For PC, Windows 10,8,7 and Mac Laptop

Idmss lite for PC, Windows 10,8,7 and Mac Laptop

How to free download Babycam For PC, Windows 10,8,7 and Mac Laptop

How to download SuperCam Plus For PC, Windows 10,8,7 And Mac Laptop

How to Free Download Sannce Cam For PC, Windows 10,8,7 and Mac Laptop

How to Free Download yyp2p App For PC, Windows 10,8,7 and Mac Laptop

How To Download Free IP WebCam Acid For PC, Windows 10,8,7 and Mac Laptop

How to Download IPC360 For PC, Windows 10,8,7 and Mac Laptop

Introduction
I got a set of wonderful loudspeakers that came with a drawback... when they are standby, they automatically accept any bluetooth pairing... this means that, at any time, any neighbor in range can connect to the speakers and activate them at full volume.
As the first time this happened has been after the warranty period, I've searched for an external solution.
I'm using those loudspeakers at my workstation so they will be ON only when I'm in front of the computer.
I had a tp-link smart socket HS100 in the office... but, even though it would have been very convenient, I did not want to use a Google assistant to activate/deactivate the loudspeakers... Neither did I want to use the cell phone application to control the socket.
That left me with a wish: controlling the socket from the computer... one batch file to start it, one batch file to stop it...
All the scripts have been modified from the ones that appear on this page.
The scripts in that page perhaps work with Linux, but they don't in Windows 10, what I've done is adapt the syntax to the Windows needs.
So thank you very much https://itnerd.space/.
Background
If you are using an older version of Windows 10 or the command is not working on your machine, you can always download a Linux port of the command to your computer.
In order to connect to the tp-link cloud servers, we will be using , therefore curl or any similar software is needed.
In order to be able to follow those steps, you will have to configure the socket using the KASA APP in your cell phone, once everything works there, you should be able to use these steps to activate and deactivate the power outlet from your computer.
Using the Code
We will need some data to be able to interact with the smart socket:
Data We Must Know in Advance
- : the password we use to connect to the tp-link devices using the KASA APP
- : the user name we use to connect to the tp-link devices using the KASA APP
Data We Create Manually
- : a UUID that we can make in any web around
Data We Get in the First Steps of the Process
- : You get it from the user and password, from that point, you can use it to control your sockets.
- : the device we want to control identifier
Notes
To execute the commands, open a CMD window and simply copy and execute it there.
First, second and third steps must be done only once. After that, you can go directly to the fourth step.
First Step: Getting the UUID
If you don't know how to get a UUID, you can use any web site dedicated to generate them like: https://www.uuidgenerator.net/version4.
There, you will automatically get a UUID.
Copy that UUID, you'll need it for the next step.
Each time you refresh the page, you get a new UUID.
Second Step: Getting the Token
We will use to get the token of our user in TP-LINK:
curl -X POST -H "Content-Type: application/json" -d "{ \"method\" : \"login\", \"params\" : {\"appType\" : \"Kasa_Android\", \"cloudPassword\" : \"OUR PASSWORD HERE\", \"cloudUserName\" : \"OUR USER NAME HERE\", \"terminalUUID\" : \"YOUR JUST ACQUIRED UUID HERE\" }}" https://eu-wap.tplinkcloud.comAs you can see, you'll need to know the username, the password and provide one UUID to get a valid token from TP-LINK servers.
Third Step: Getting the Device ID
Again, is our preferred tool here to require the devices list we have in our TP-LINK account:
curl -X POST -H "Content-Type: application/json" -d "{ \"method\" : \"getDeviceList\" }" https://eu-wap.tplinkcloud.com?token=YOUR JUST ACQUIRED TOKEN HEREAs you can see, we are using the valid token we've got from TP-LINK servers in the second step.
This step will give us an output with all the devices in our house/office... we will have to copy the ID of the device we want to control.
Fourth Step: Activating or Deactivating the Socket
The final step and the objective of this tip/trick:
We can now activate our socket by using this command:
curl -X POST -H "Content-Type: application/json" -d "{ \"method\" : \"passthrough\", \"params\" : { \"deviceId\" : \"OUR DEVICE ID HERE\", \"requestData\" : '{ \"system\" : { \"set_relay_state\" : { \"state\" : 1}}}'}}" https://eu-wap.tplinkcloud.com/?token=OUR TOKEN HEREThe important bit here is the number after the clause... this tells the socket to get powered on.
In order to deactivate the socket we will replace that 1 for a 0 as:
curl -X POST -H "Content-Type: application/json" -d "{ \"method\" : \"passthrough\", \"params\" : { \"deviceId\" : \"OUR DEVICE ID HERE\", \"requestData\" : '{ \"system\" : { \"set_relay_state\" : { \"state\" : 0}}}'}}" https://eu-wap.tplinkcloud.com/?token=OUR TOKEN HEREOnce you've reached this point, you can directly use the commands in this step to control the plug, no need to perform all the steps each time. Steps 1, 2 and 3 are needed only the first time.
Hope this helps you to be able to connect and disconnect devices from your computer.
In my case, I can simply double click an icon on my desktop to get the loudspeakers active and once I stop using the computer, I can deactivate them again, double clicking another desktop icon.
History
- 19th July, 2019: Initial version
What’s New in the Kasa App For PC Archives?
Screen Shot

System Requirements for Kasa App For PC Archives
- First, download the Kasa App For PC Archives
-
You can download its setup from given links:

Kasa App For PC Archives & Key Download

Kasa App For PC Archives& Key Download
